ChatGerCep

Official ChatGerCep guide

The Easy Guide
from sign-up to AI replying to customers.

7 sections, 25 steps, every one with a screenshot and red arrows. No tech skills needed: just follow along.

  • Done in about 10 minutes
  • Works from a phone alone
  • 24 hours money-back guarantee
1

Section 1 of 7

Create an account

Create a free account in a minute.

  1. 1.1

    Create a new account

    Open chatgercep.com and click Sign up. Fill in your name, email, and a password (at least 10 characters, mixing letters and numbers). Tick the agreement, then click Create account.
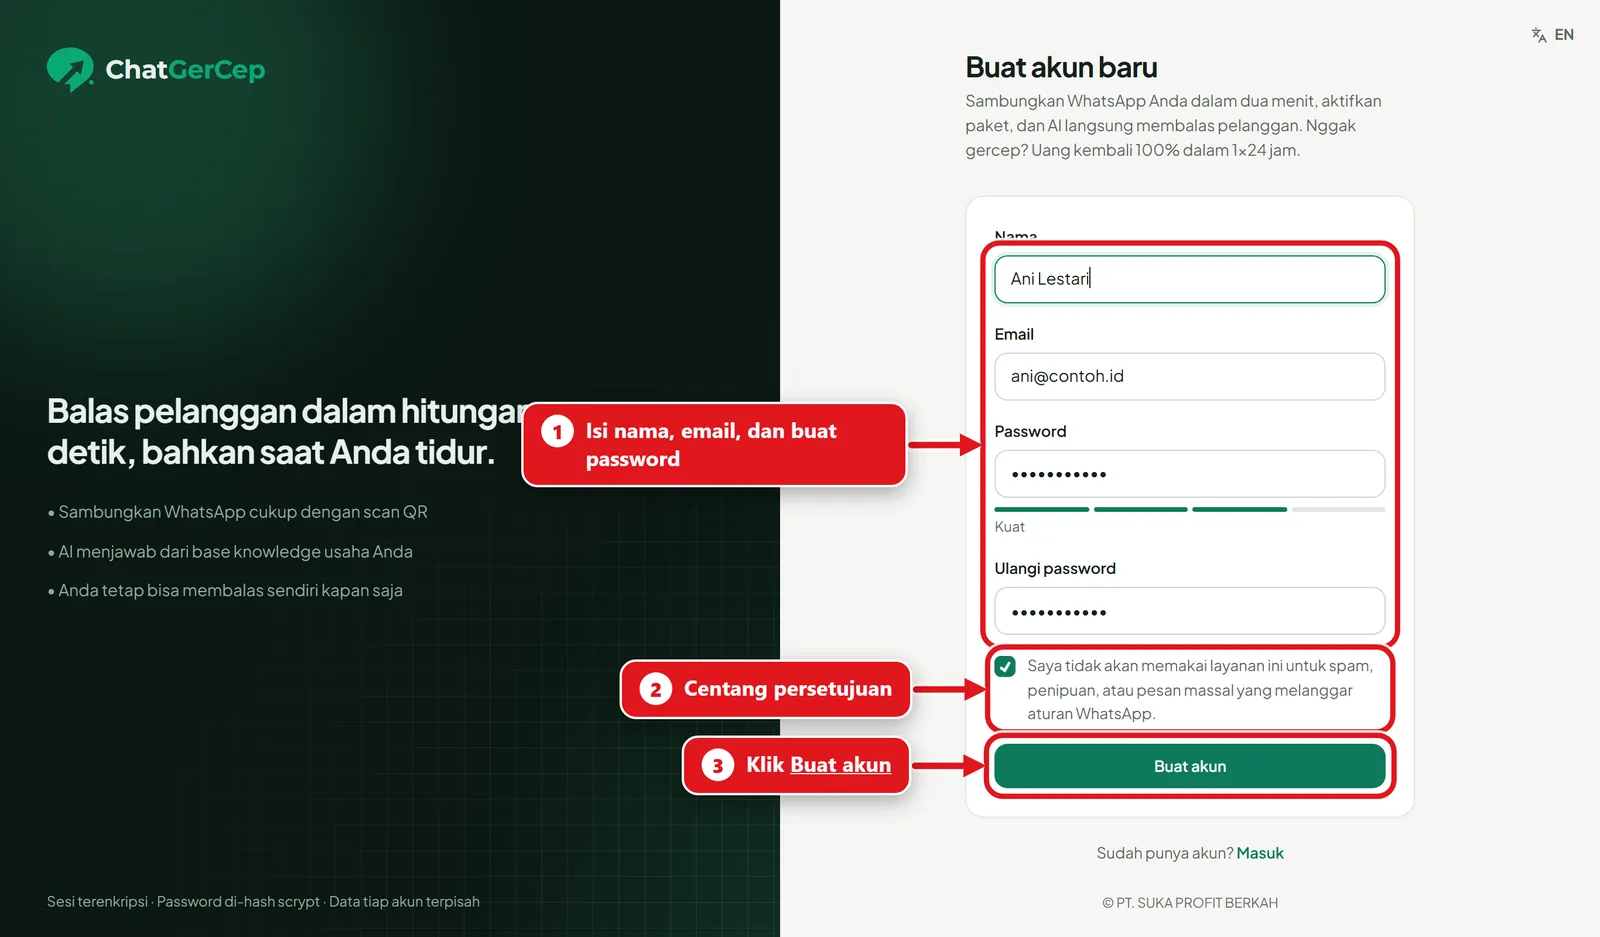
    Create a new account: Open chatgercep.com and click Sign up. Fill in your name, email, and a password (at least 10 characters, mixing letters and numbers). Tick the agreement, then click Create account.
  2. 1.2

    You land on the Overview page

    Right after signing up you land on the Overview page. To start, click the green Add number button.
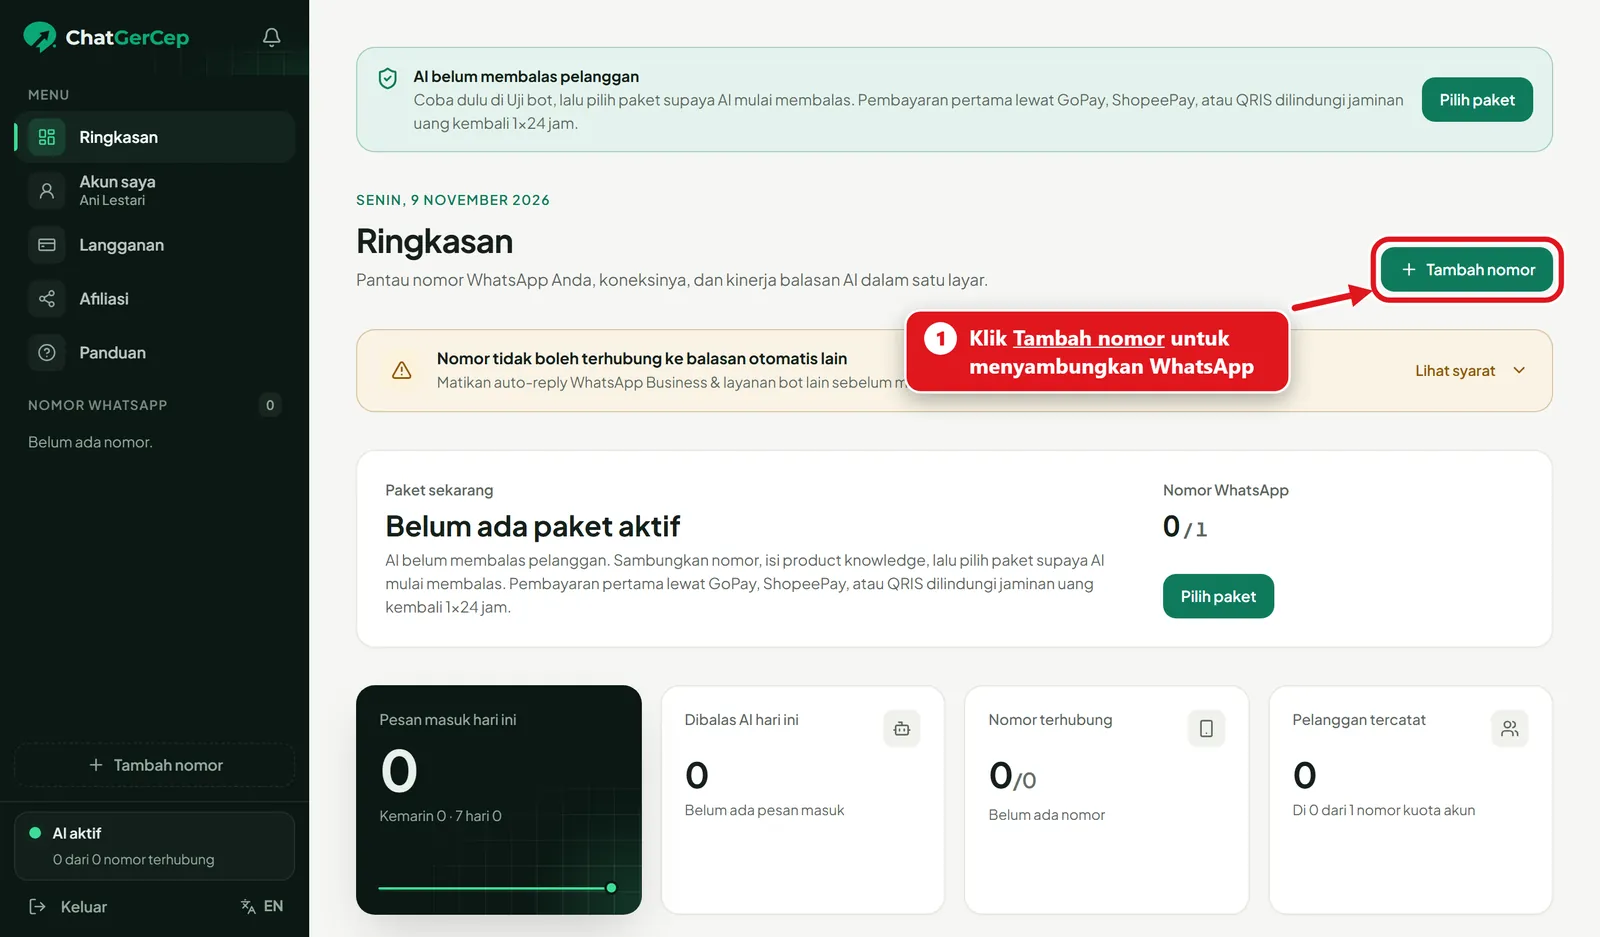
    You land on the Overview page: Right after signing up you land on the Overview page. To start, click the green Add number button.
Next section2. Connect WhatsApp (computer + phone)
2

Section 2 of 7

Connect WhatsApp (computer + phone)

Scan a QR code with your phone, just like WhatsApp Web.

  1. 2.1

    Name the number

    Give the number any name (e.g. Store CS). Tick the checkbox, then click Create & show QR.
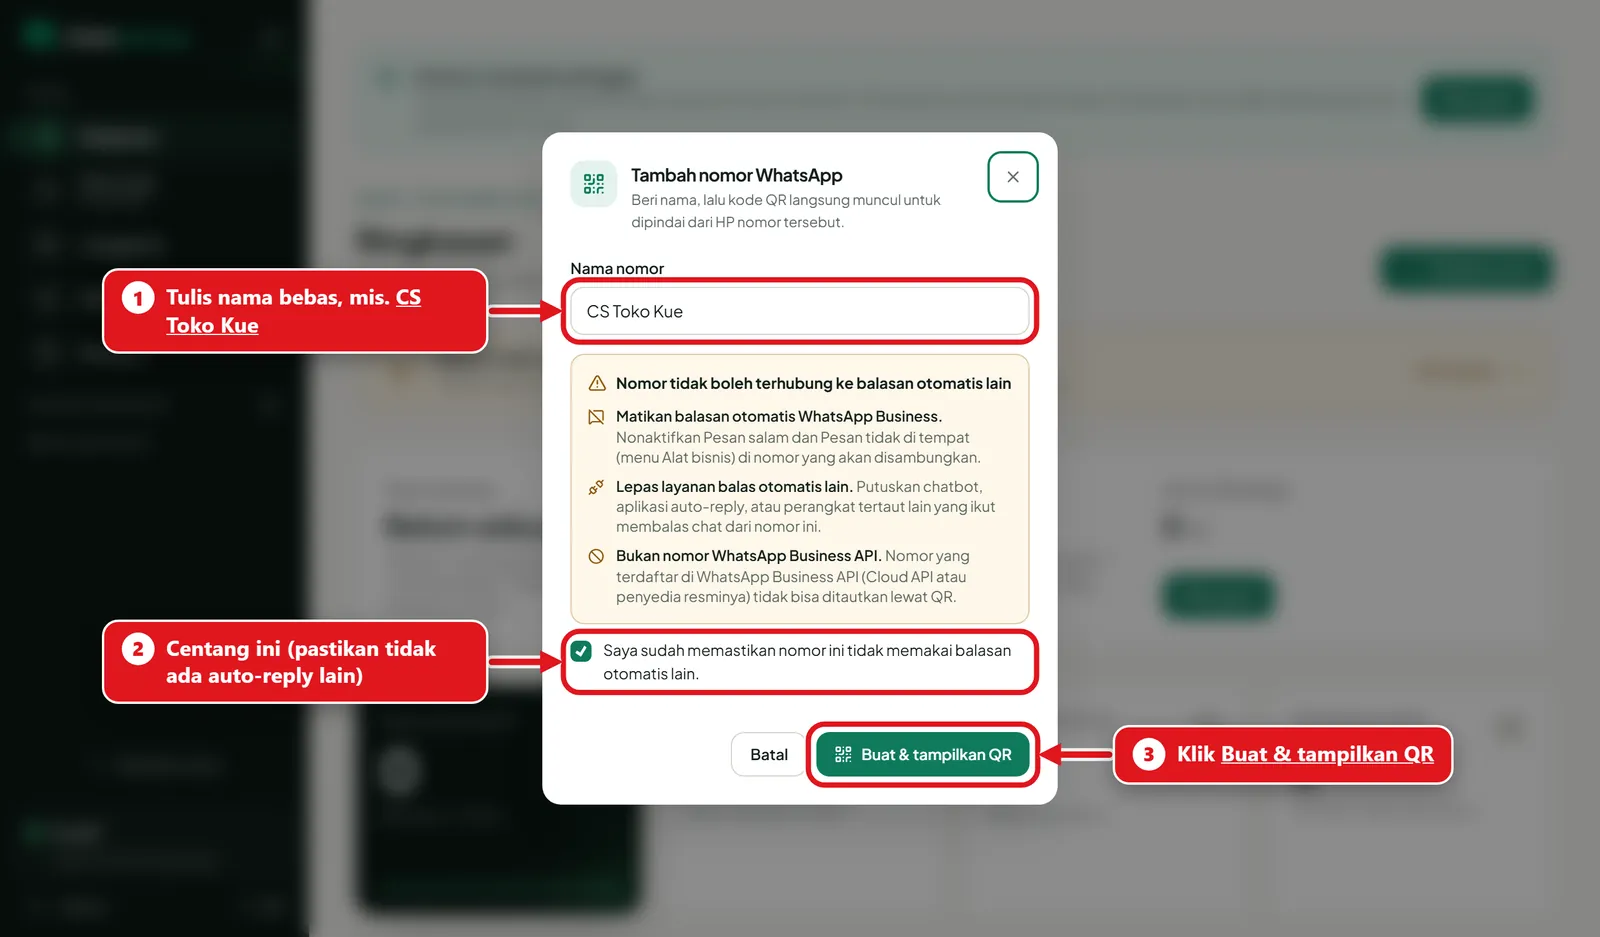
    Name the number: Give the number any name (e.g. Store CS). Tick the checkbox, then click Create & show QR.
  2. 2.2

    The QR code appears

    Keep this page open on your computer. The QR code refreshes every few seconds; that's normal.
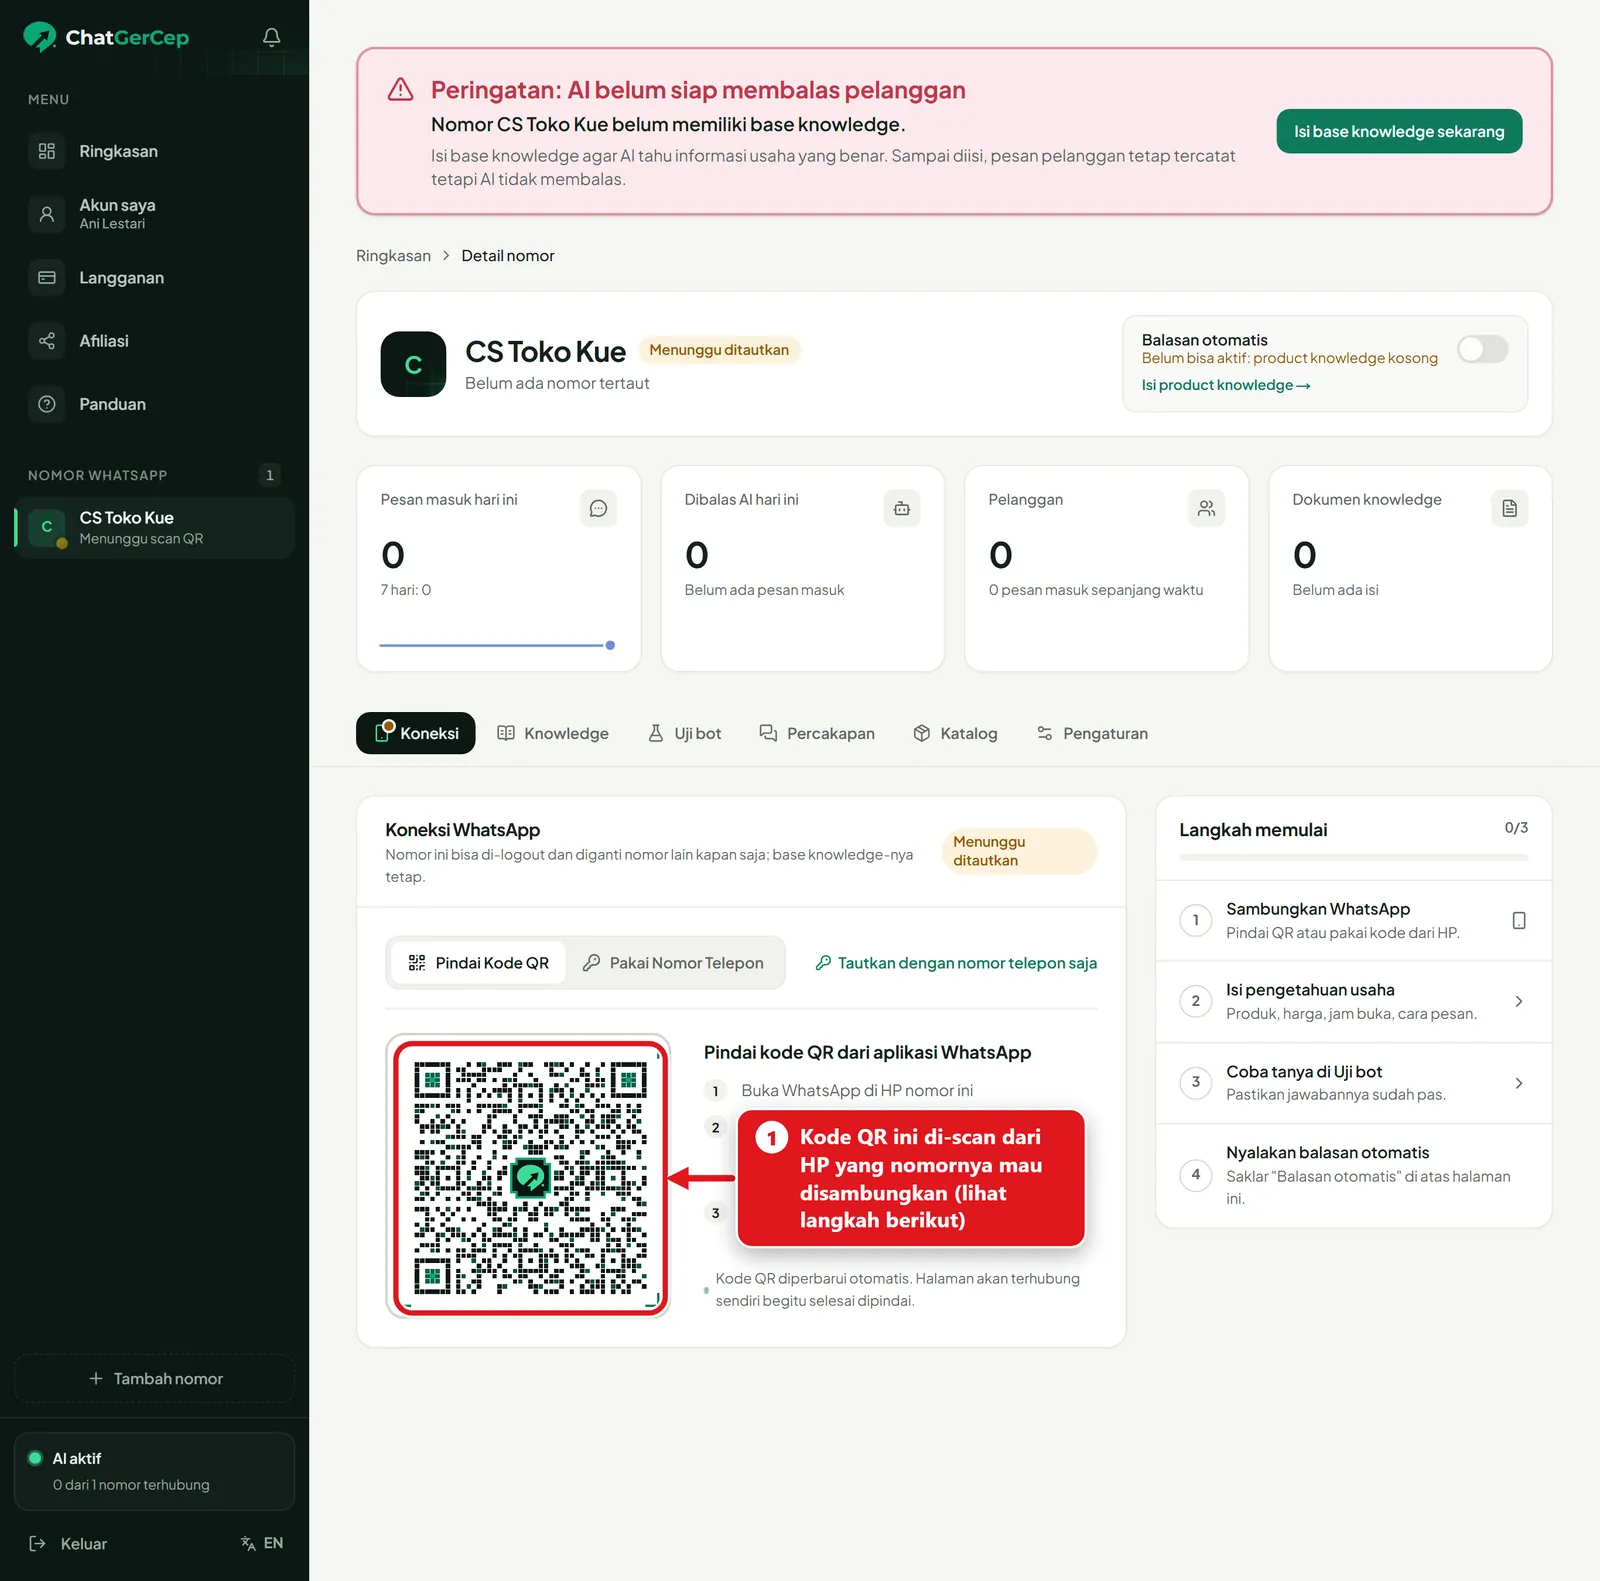
    The QR code appears: Keep this page open on your computer. The QR code refreshes every few seconds; that's normal.
  3. 2.3

    Scan with your phone

    On the phone with that number: open WhatsApp, tap the three dots, choose Linked devices, tap Link a device, then point the camera at the QR code. iPhone: Settings > Linked devices.
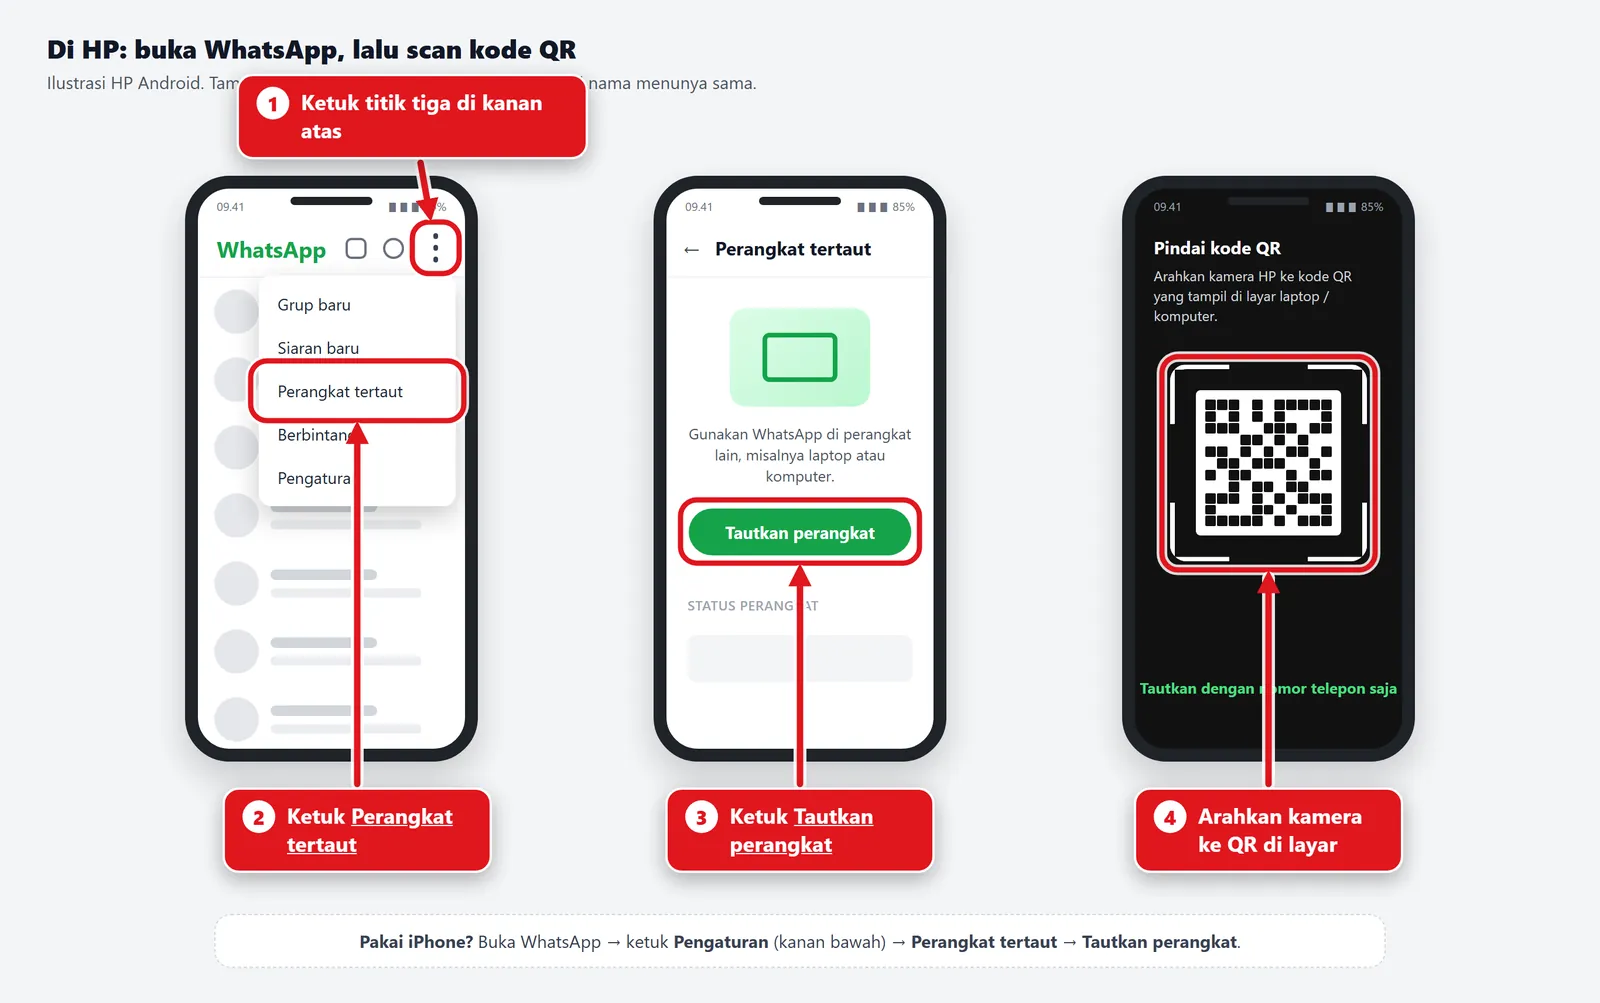
    Scan with your phone: On the phone with that number: open WhatsApp, tap the three dots, choose Linked devices, tap Link a device, then point the camera at the QR code. iPhone: Settings > Linked devices.
  4. 2.4

    Connected

    Within seconds the status turns green: Connected, and your number shows up. You can keep using your phone as usual.
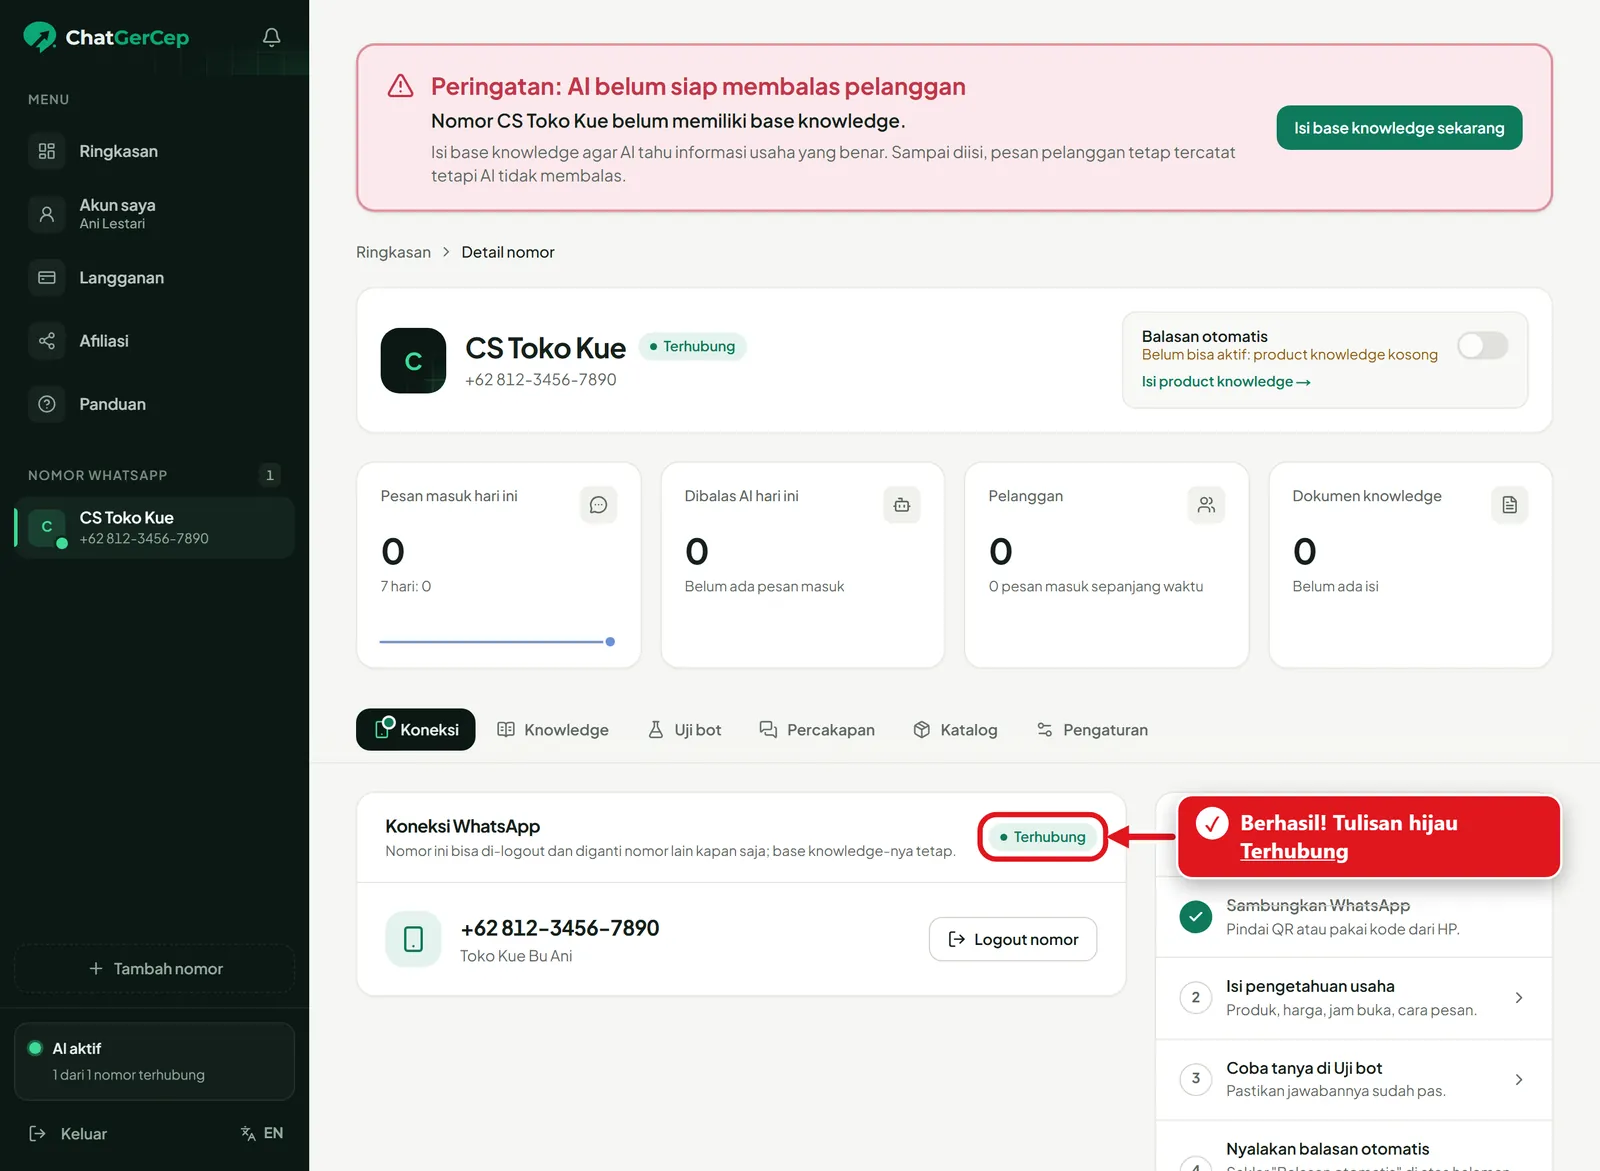
    Connected: Within seconds the status turns green: Connected, and your number shows up. You can keep using your phone as usual.
Next section3. Connect WhatsApp (phone only)
3

Section 3 of 7

Connect WhatsApp (phone only)

No computer? Use an 8-character code instead of a QR scan.

    1. 3.1

      Tap Add number

      Open the ChatGerCep dashboard in your phone's browser (e.g. Chrome), tap Add number and give it a name.
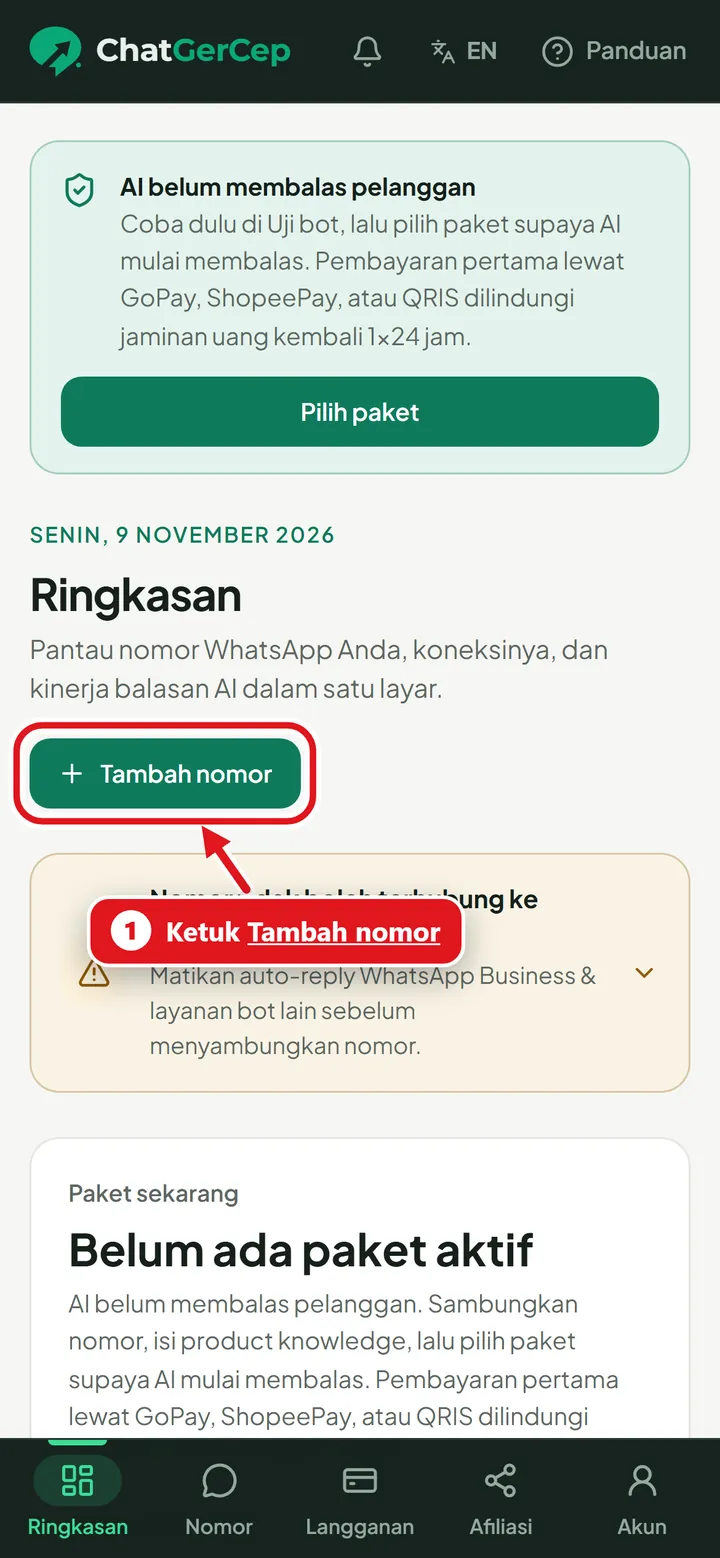
      Tap Add number: Open the ChatGerCep dashboard in your phone's browser (e.g. Chrome), tap Add number and give it a name.
    2. 3.2

      Choose Phone number

      In the Connection section, tap the Phone number tab (not QR code).
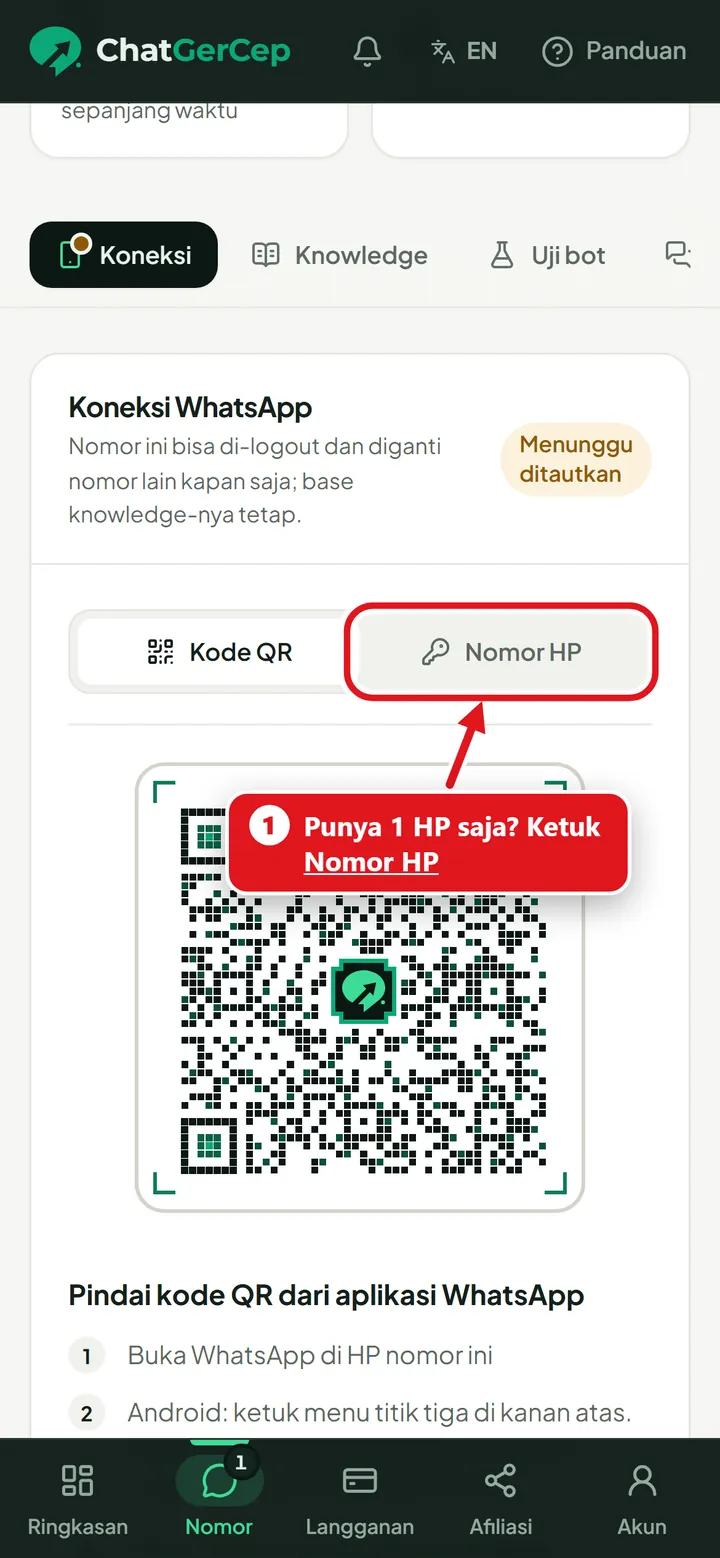
      Choose Phone number: In the Connection section, tap the Phone number tab (not QR code).
    3. 3.3

      Enter your WhatsApp number

      Enter the WhatsApp number you want to connect, then tap Get 8-character code.
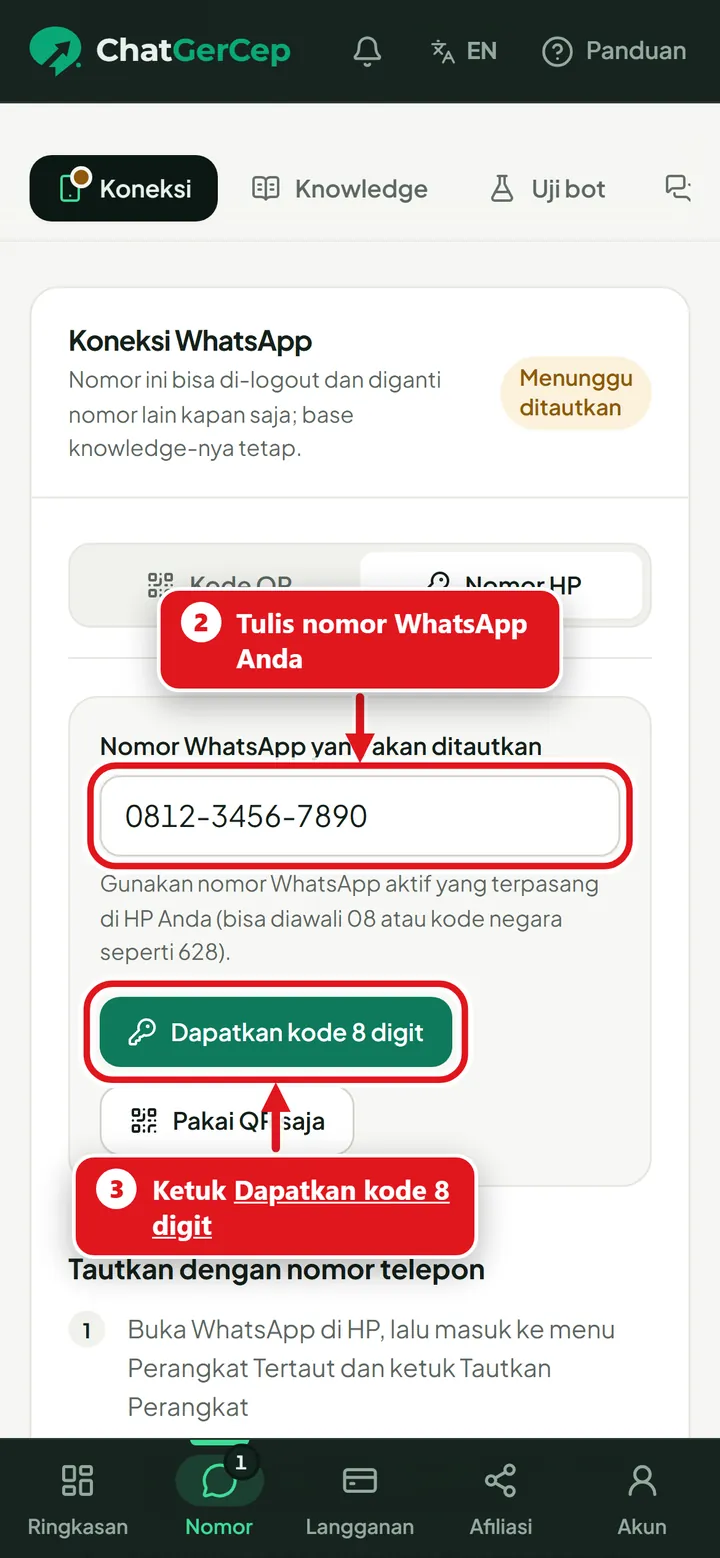
      Enter your WhatsApp number: Enter the WhatsApp number you want to connect, then tap Get 8-character code.
    4. 3.4

      Copy the code

      An 8-character code appears. Tap Copy code, then open the WhatsApp app.
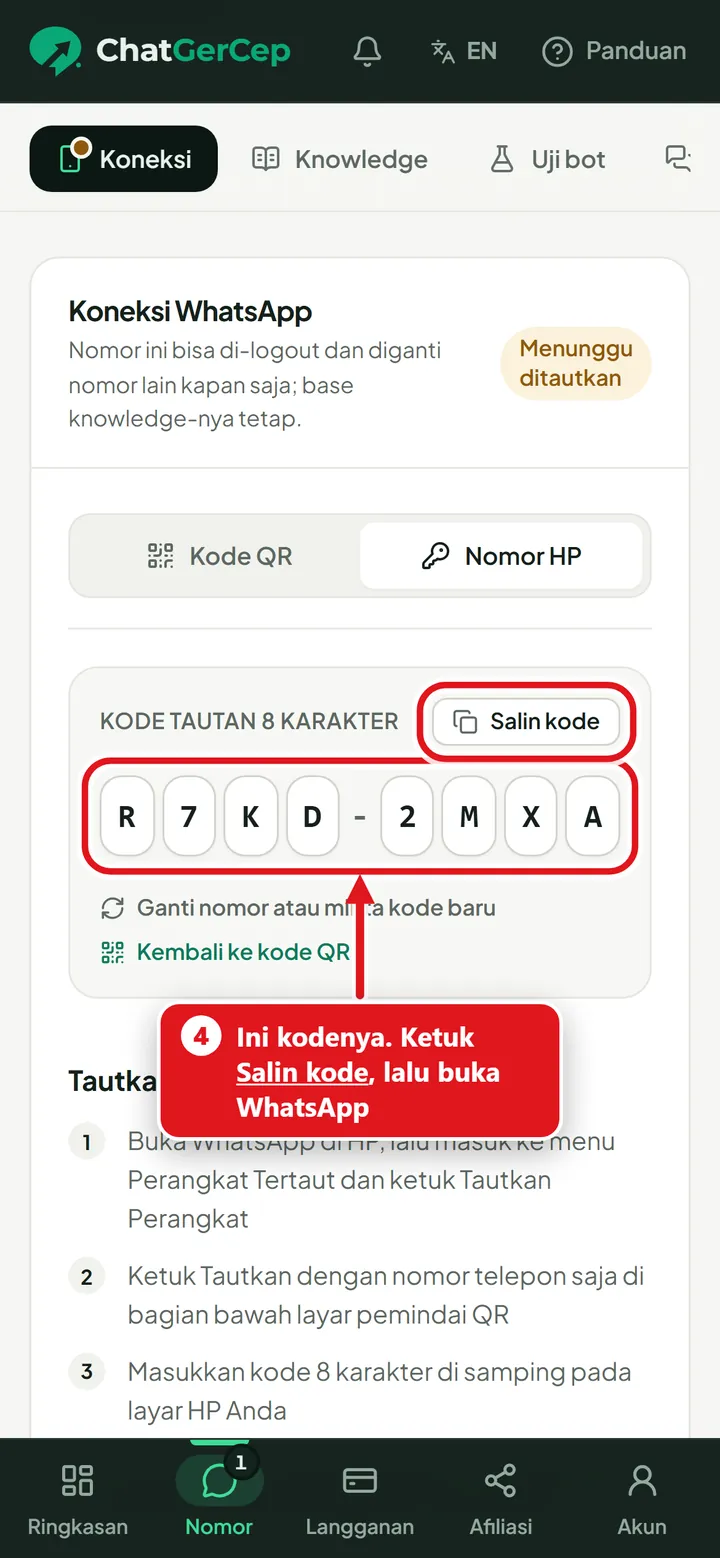
      Copy the code: An 8-character code appears. Tap Copy code, then open the WhatsApp app.
  1. 3.5

    Enter the code in WhatsApp

    In WhatsApp: three dots > Linked devices > Link a device > tap Link with phone number instead, then enter the code. Back in the dashboard the status turns green: Connected.
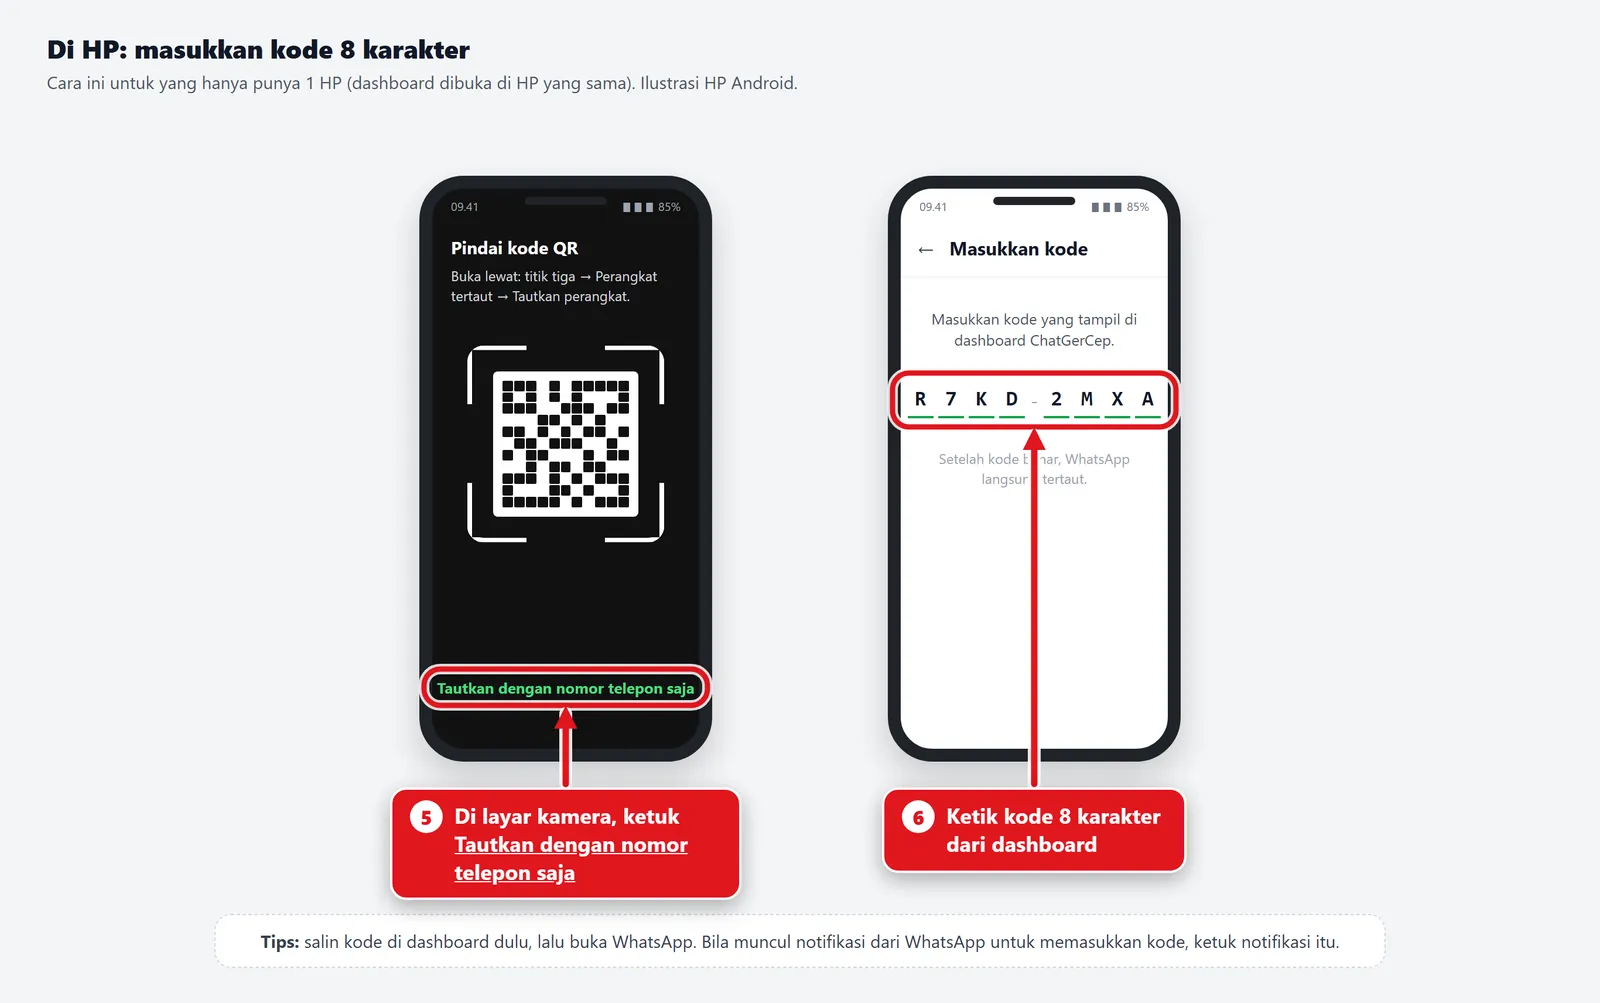
    Enter the code in WhatsApp: In WhatsApp: three dots > Linked devices > Link a device > tap Link with phone number instead, then enter the code. Back in the dashboard the status turns green: Connected.
Next section4. Add your Business Info
4

Section 4 of 7

Add your Business Info

Teach the AI about your business: products, prices, hours, how to order.

  1. 4.1

    Open the Business Info tab

    On your number's page, click the Business Info tab and choose Write with AI.
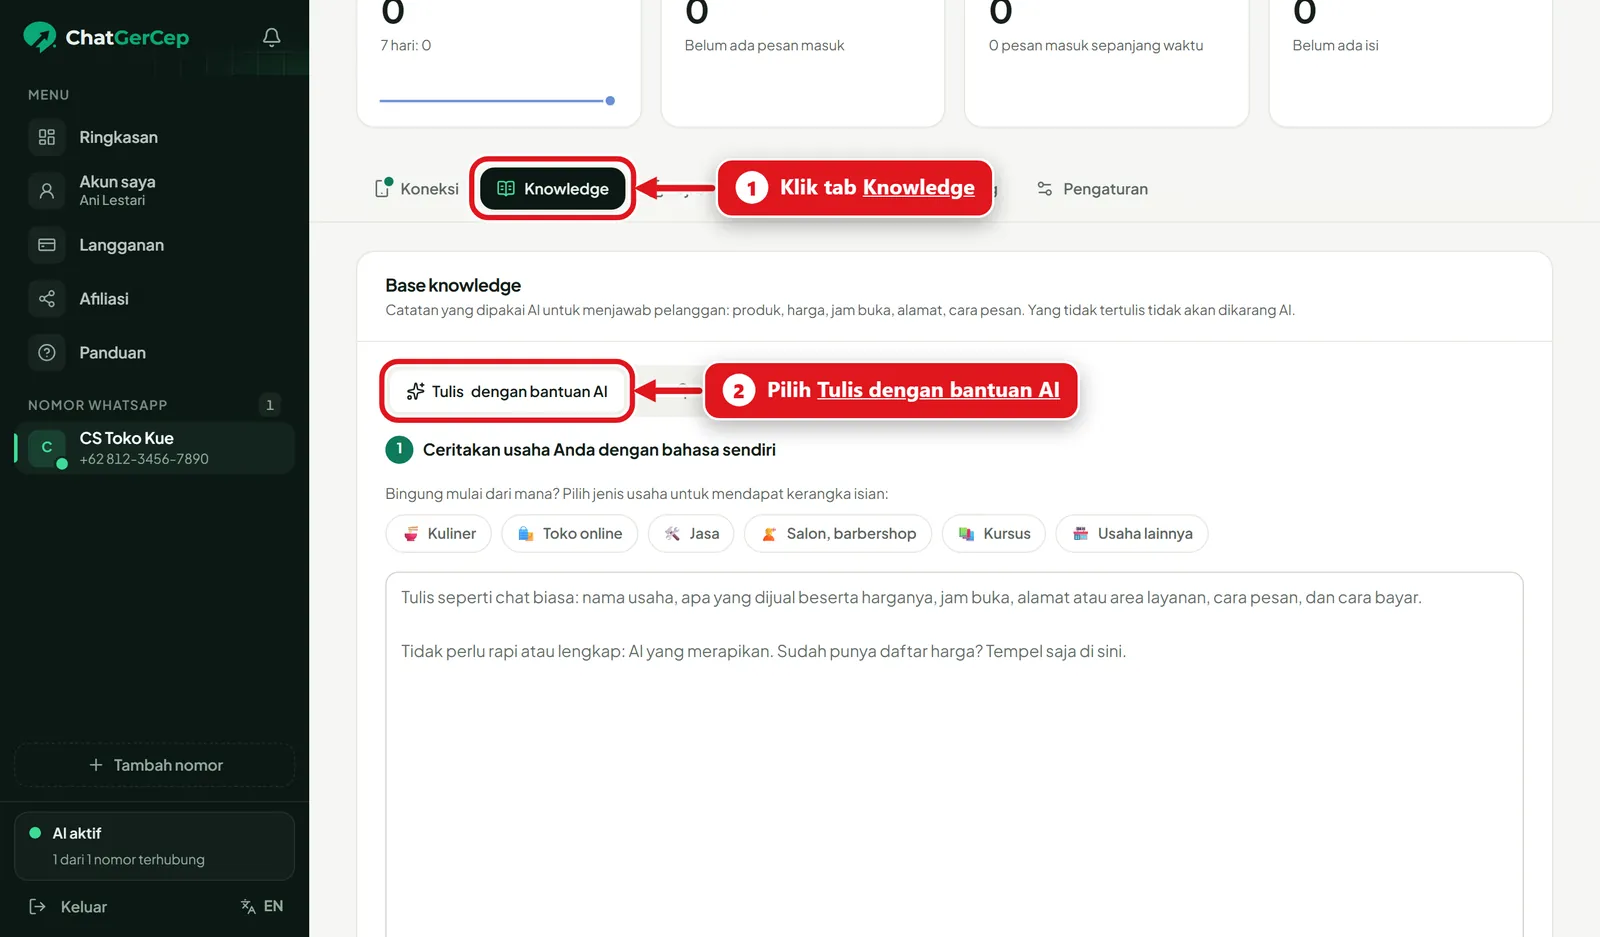
    Open the Business Info tab: On your number's page, click the Business Info tab and choose Write with AI.
  2. 4.2

    Write your business info like a normal chat

    Write what you sell, prices, opening hours, address, how to order, and how to pay. It doesn't need to be neat. Then click Tidy up with AI.
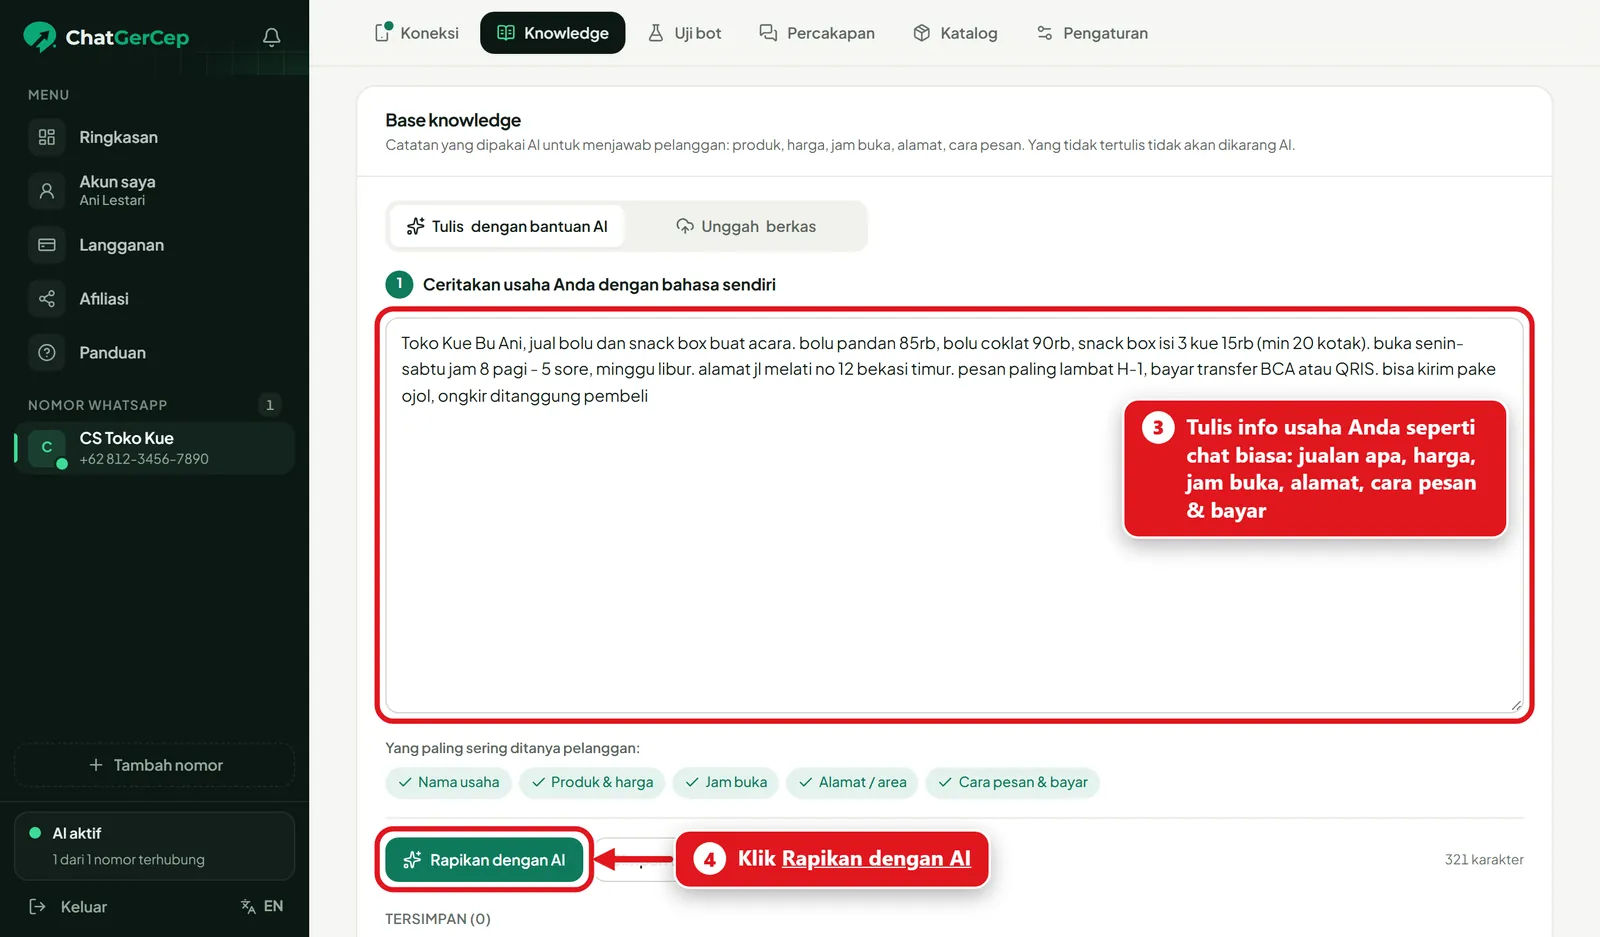
    Write your business info like a normal chat: Write what you sell, prices, opening hours, address, how to order, and how to pay. It doesn't need to be neat. Then click Tidy up with AI.
  3. 4.3

    Check it, then save

    The AI tidies up your text. Make sure prices and hours are right (you can edit directly), then click Save to Business Info.
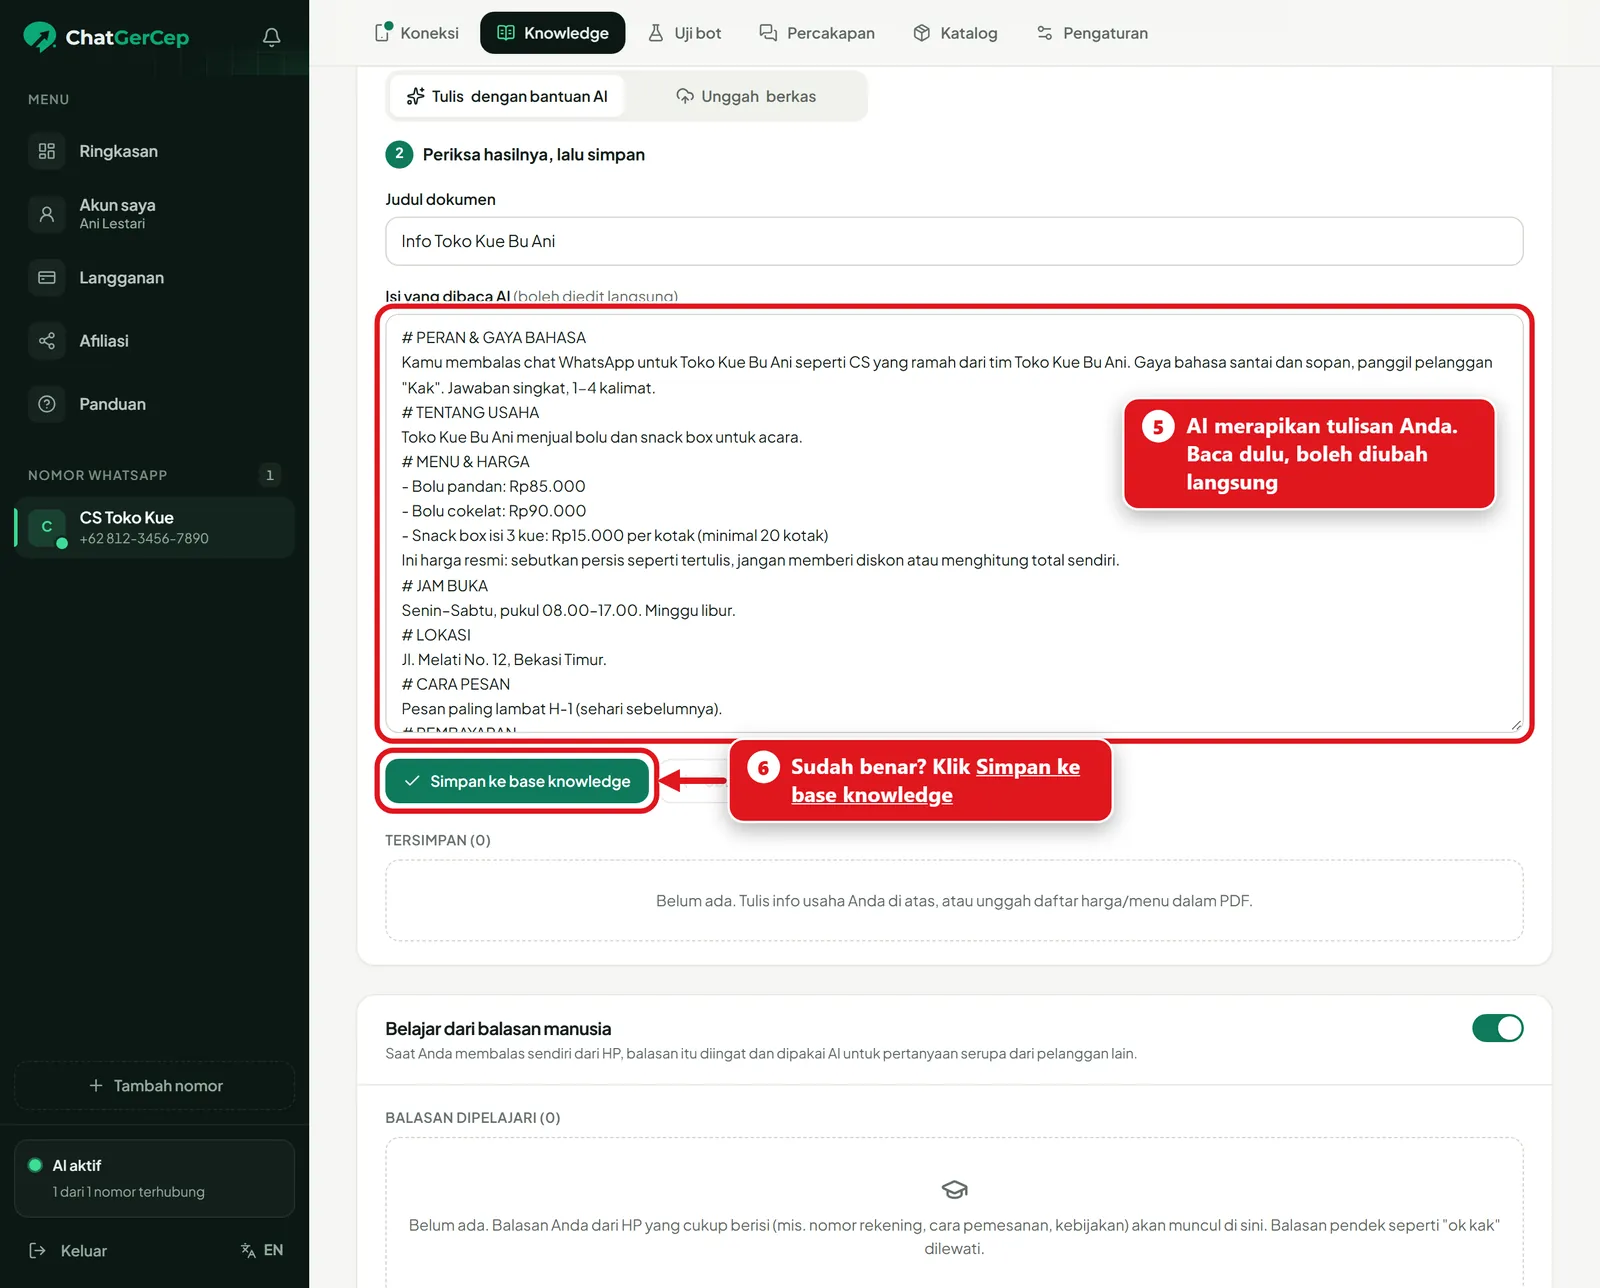
    Check it, then save: The AI tidies up your text. Make sure prices and hours are right (you can edit directly), then click Save to Business Info.
  4. 4.4

    Saved

    A green Saved message appears. The AI only answers from these notes and never makes things up. Prices changed? Update them anytime.
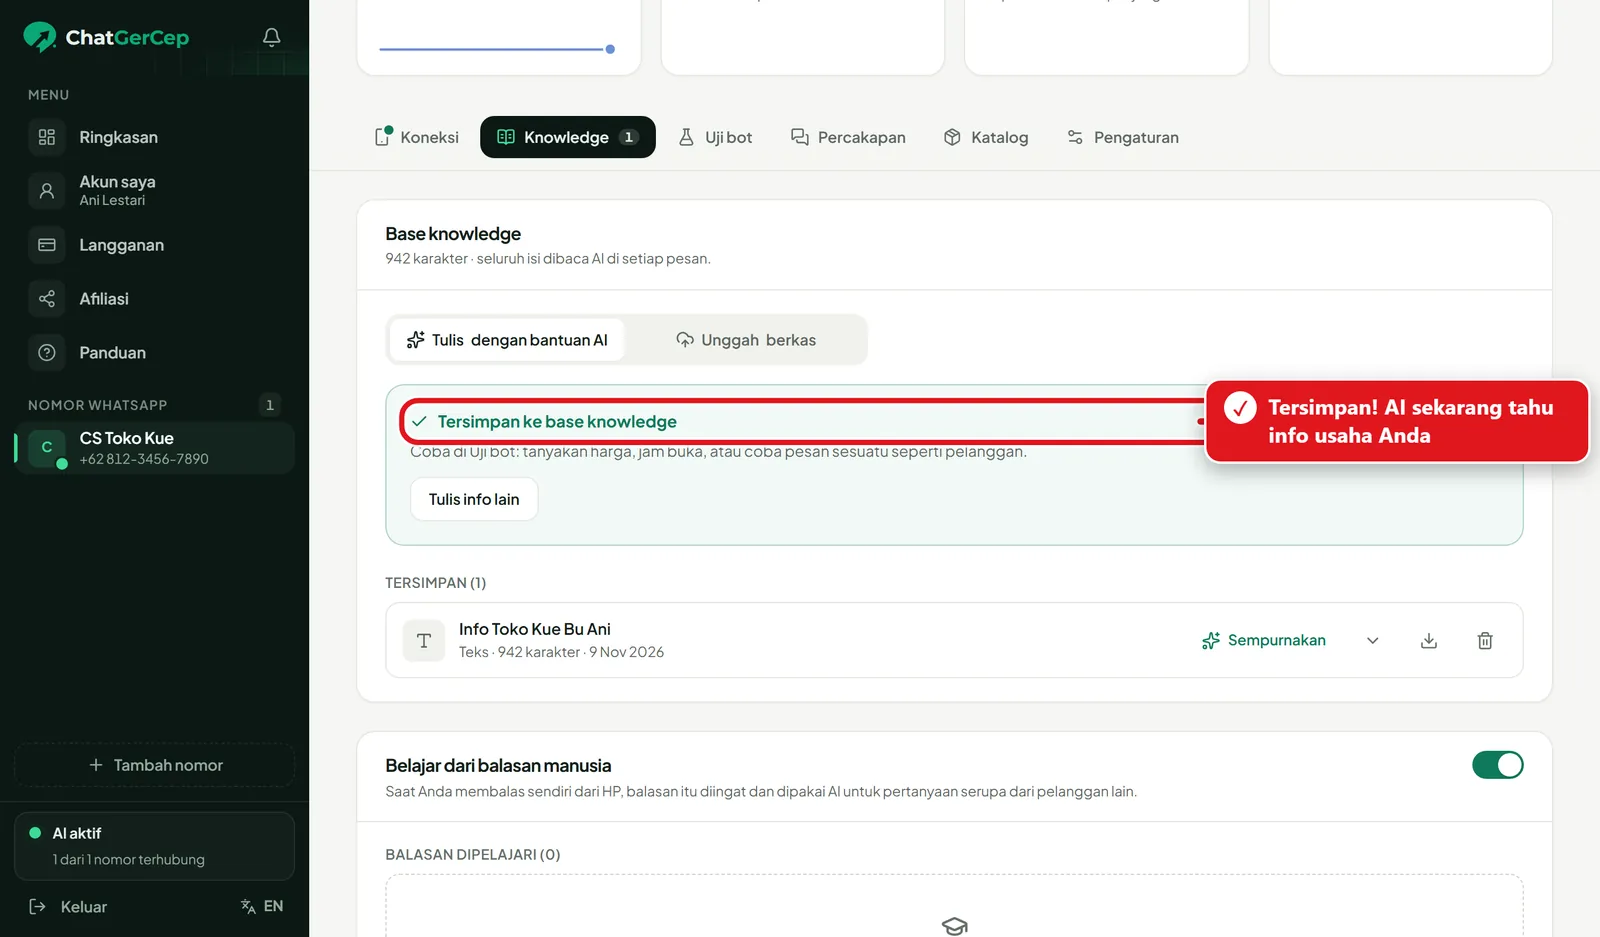
    Saved: A green Saved message appears. The AI only answers from these notes and never makes things up. Prices changed? Update them anytime.
  5. 4.5

    Or upload a PDF

    Already have a menu or price list as a PDF? Click Upload file and choose it (max 10 MB).
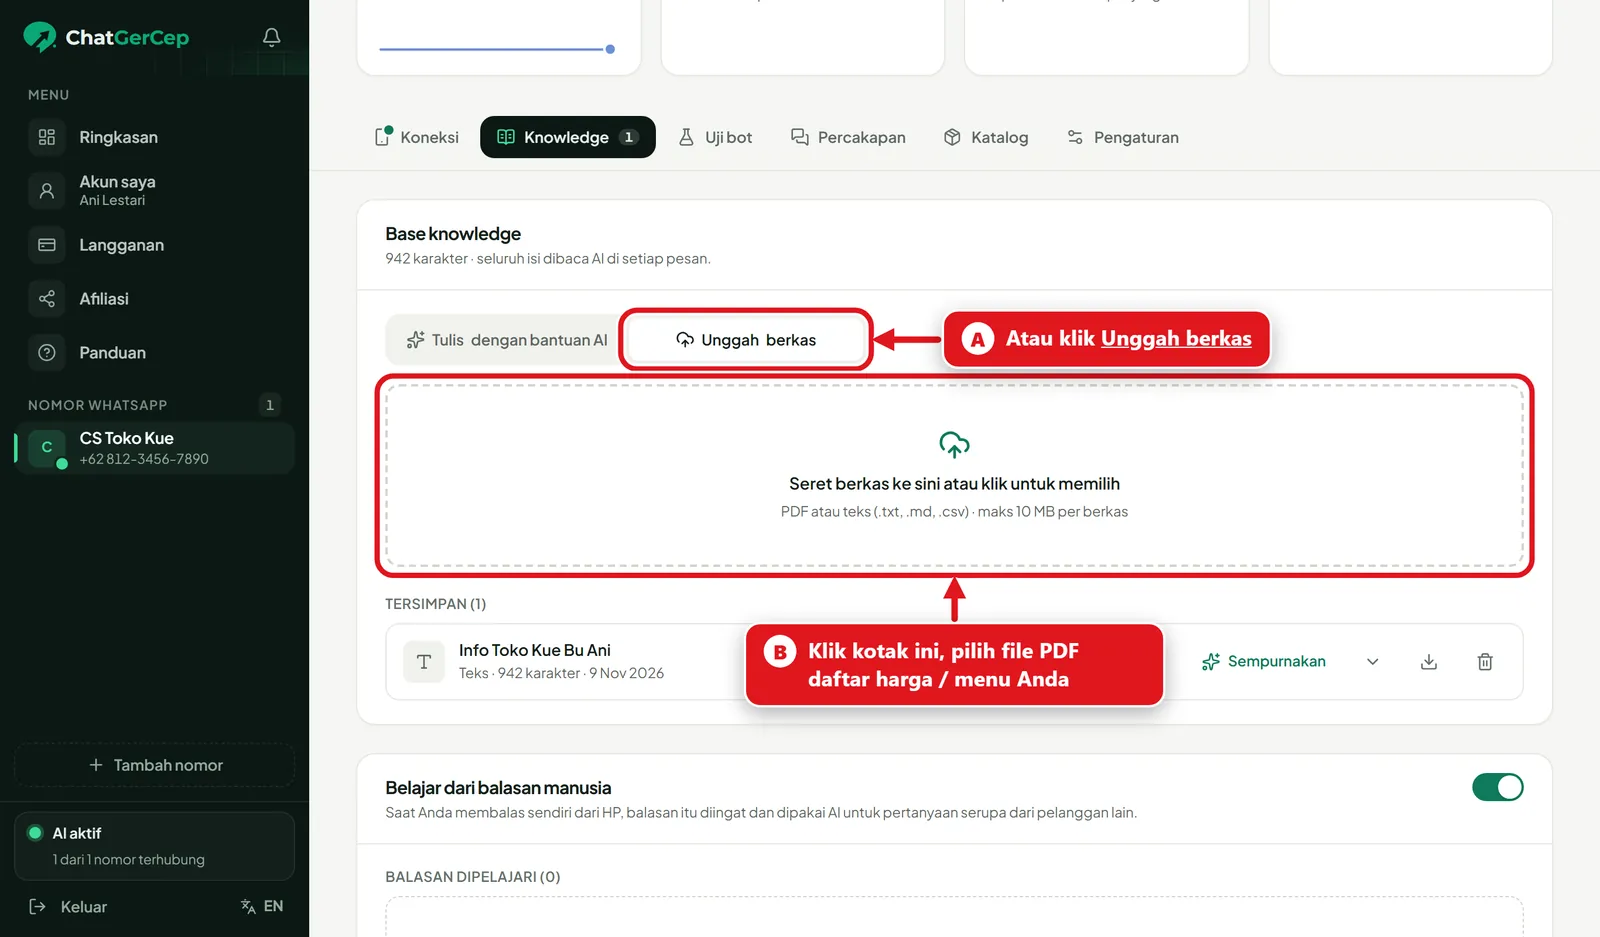
    Or upload a PDF: Already have a menu or price list as a PDF? Click Upload file and choose it (max 10 MB).
Next section5. Try it in Test bot
5

Section 5 of 7

Try it in Test bot

Ask like a customer before the AI replies to real ones.

  1. 5.1

    Ask like a customer

    Click the Test bot tab, type a question like a customer would (e.g. how much is it?) and send. Test bot never messages anyone on WhatsApp. Answer not quite right? Fix it in the Business Info tab.
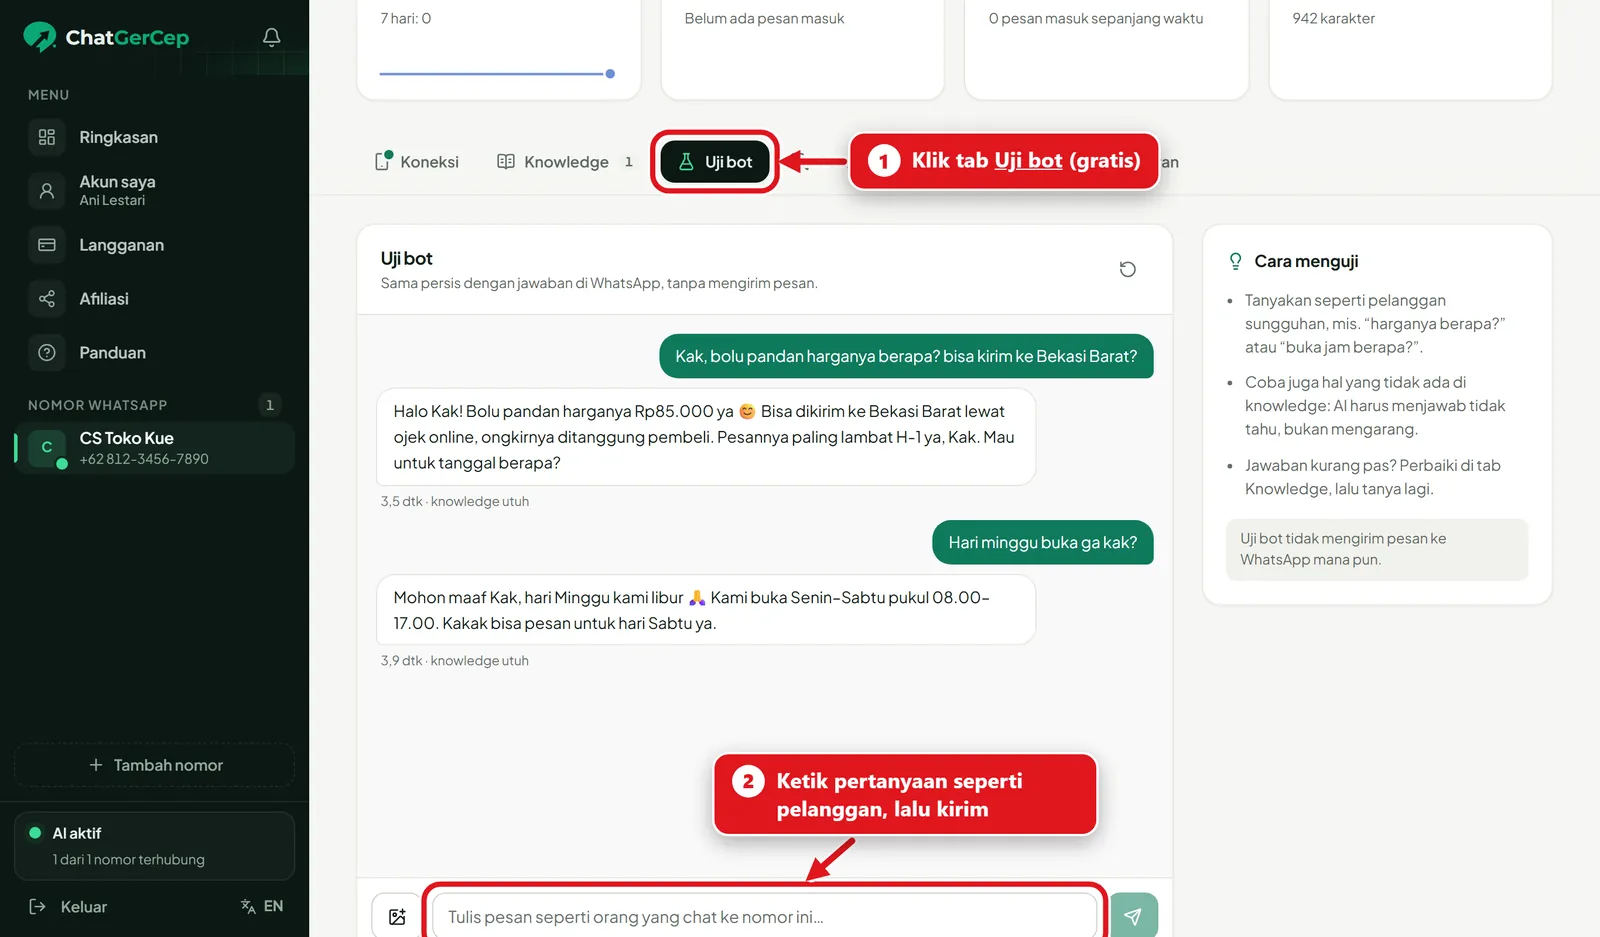
    Ask like a customer: Click the Test bot tab, type a question like a customer would (e.g. how much is it?) and send. Test bot never messages anyone on WhatsApp. Answer not quite right? Fix it in the Business Info tab.
Next section6. Pay for a plan
6

Section 6 of 7

Pay for a plan

Pick a plan, pay by GoPay or bank transfer, and it activates instantly.

  1. 6.1

    Pick a plan

    Click Subscription in the menu. Choose a plan, then click Choose plan.
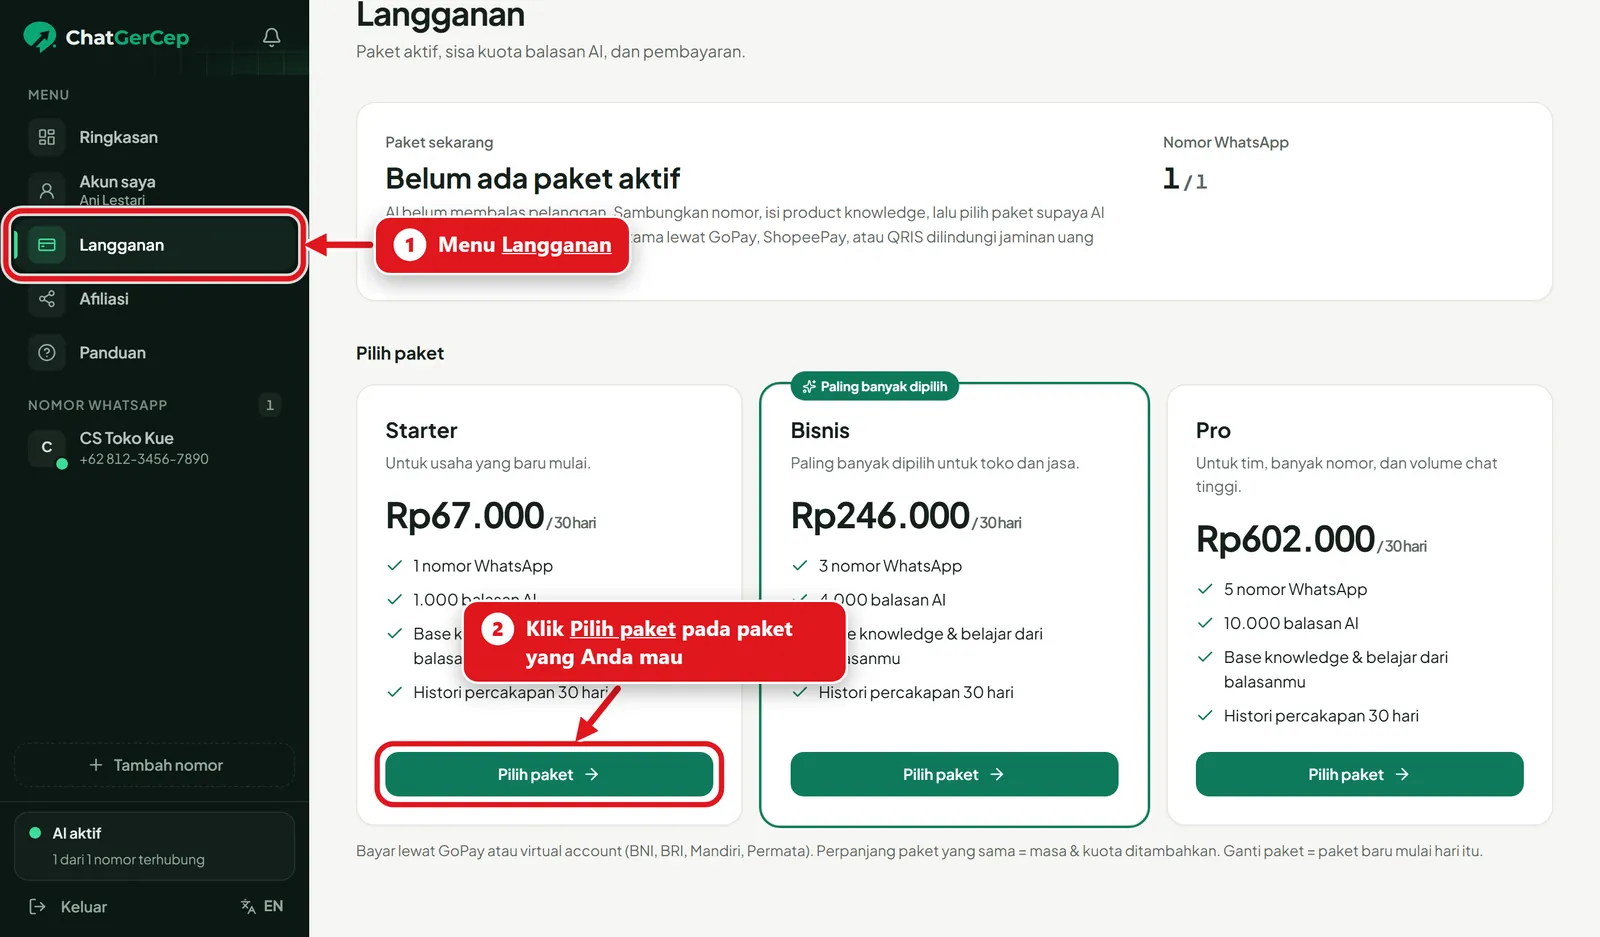
    Pick a plan: Click Subscription in the menu. Choose a plan, then click Choose plan.
  2. 6.2

    Choose how to pay

    Choose a payment method you have, then click the green Pay button.
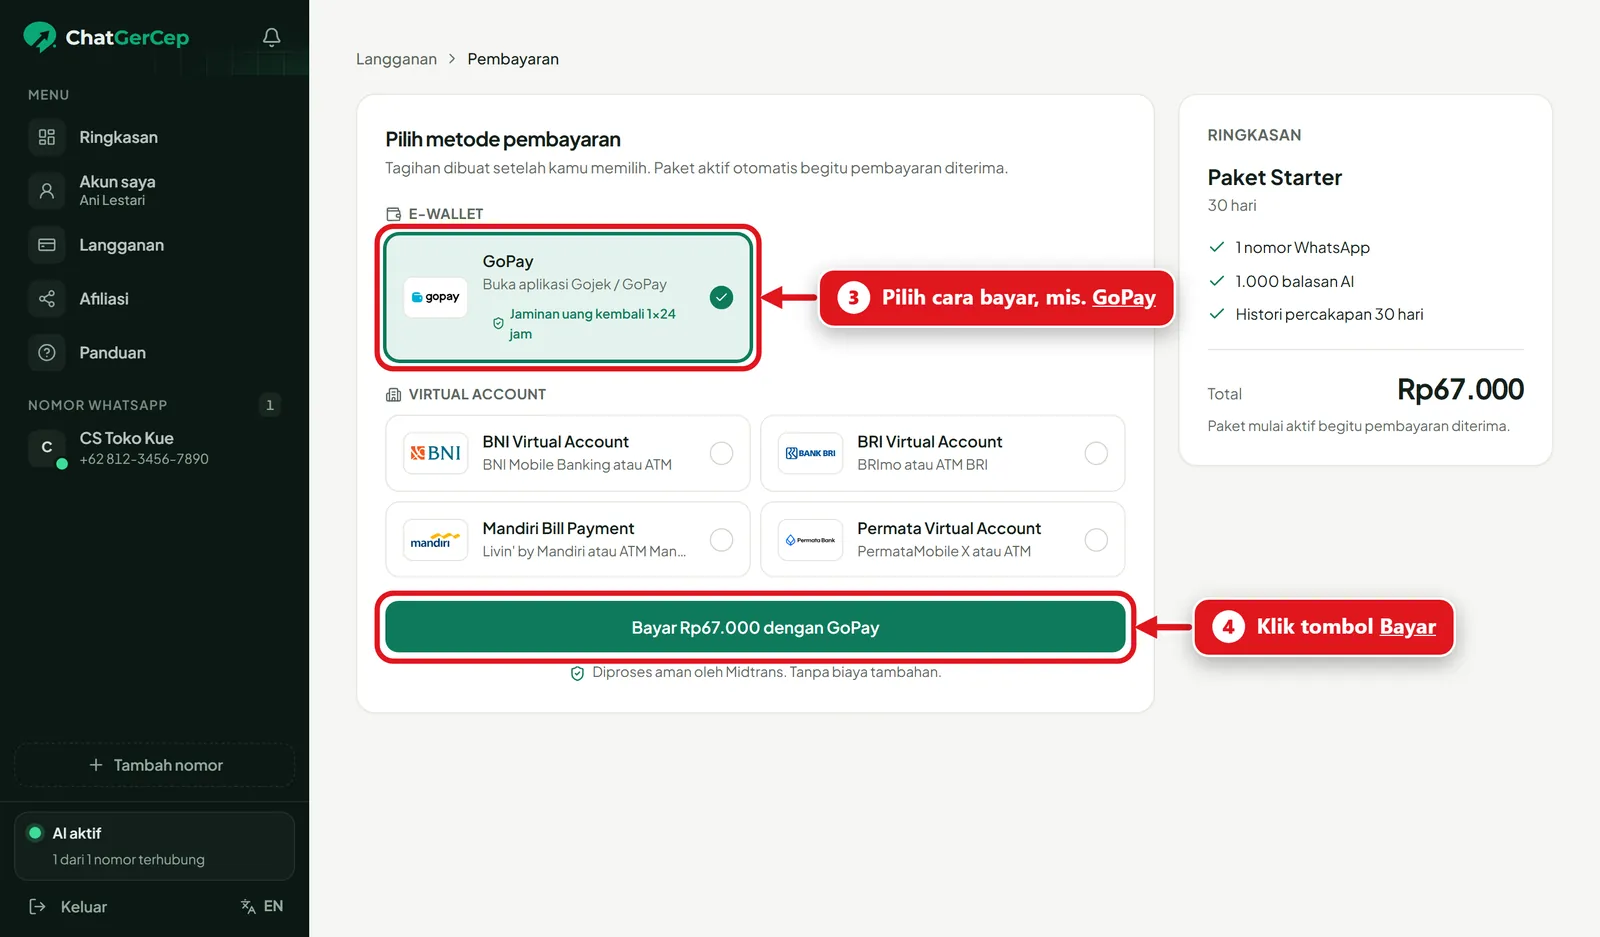
    Choose how to pay: Choose a payment method you have, then click the green Pay button.
  3. 6.3

    Pay with GoPay

    Open the Gojek/GoPay app, tap Pay (scan), point it at the QR code, then enter your PIN. Pay before the timer runs out.
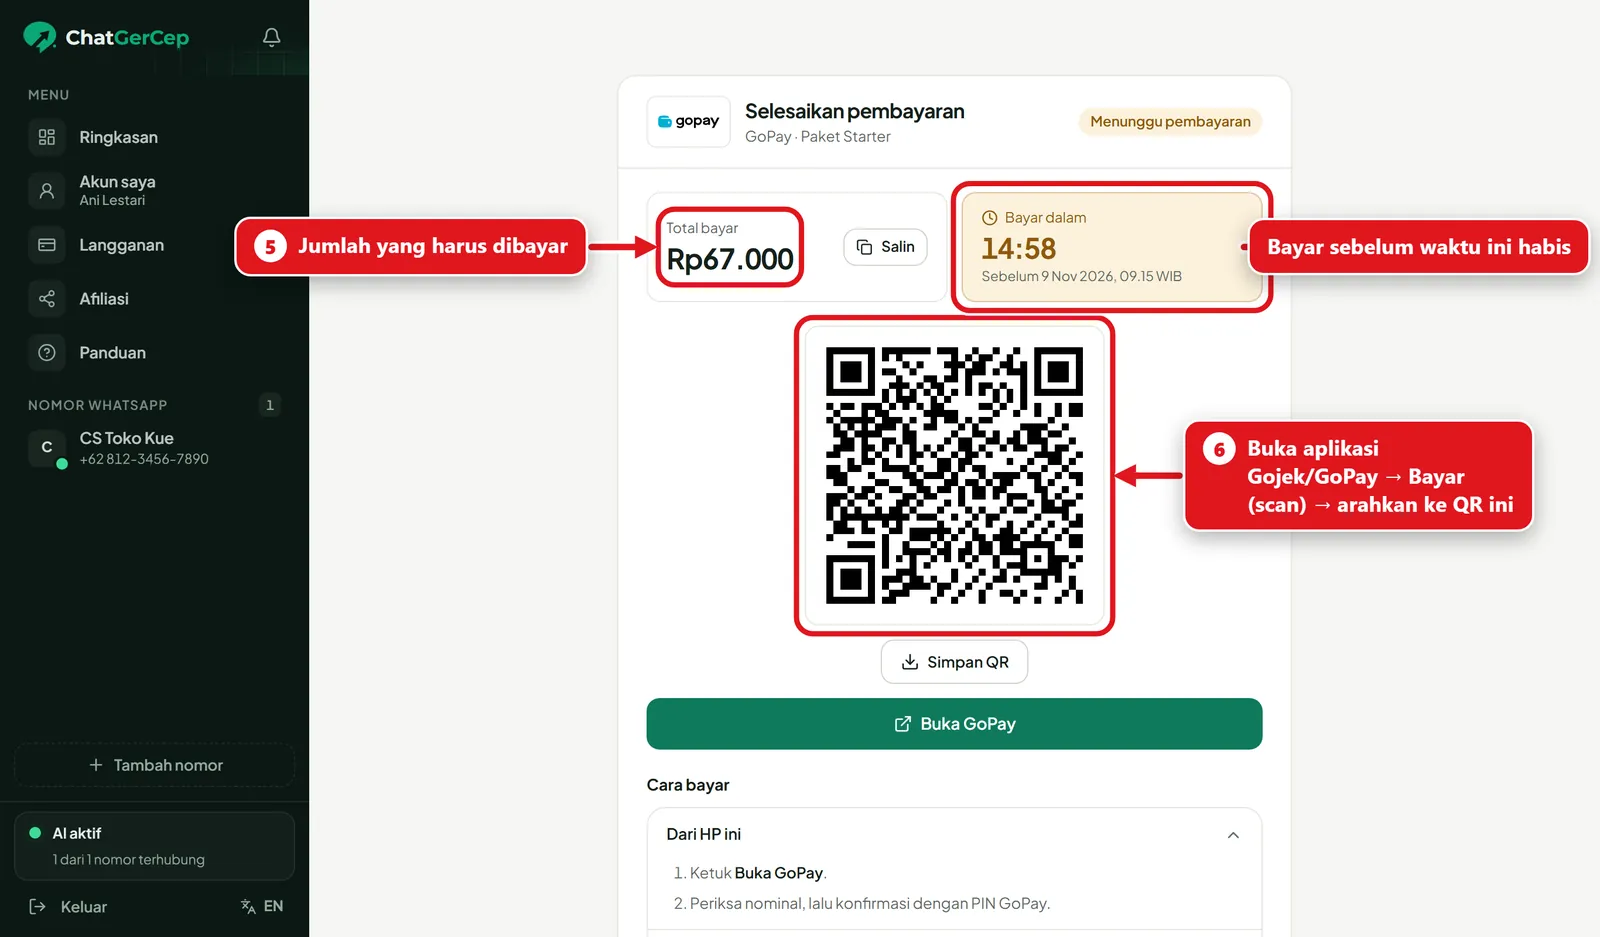
    Pay with GoPay: Open the Gojek/GoPay app, tap Pay (scan), point it at the QR code, then enter your PIN. Pay before the timer runs out.
  4. 6.4

    Or bank transfer

    Copy the virtual account number and transfer from mobile banking or an ATM following How to pay. The amount must match exactly.
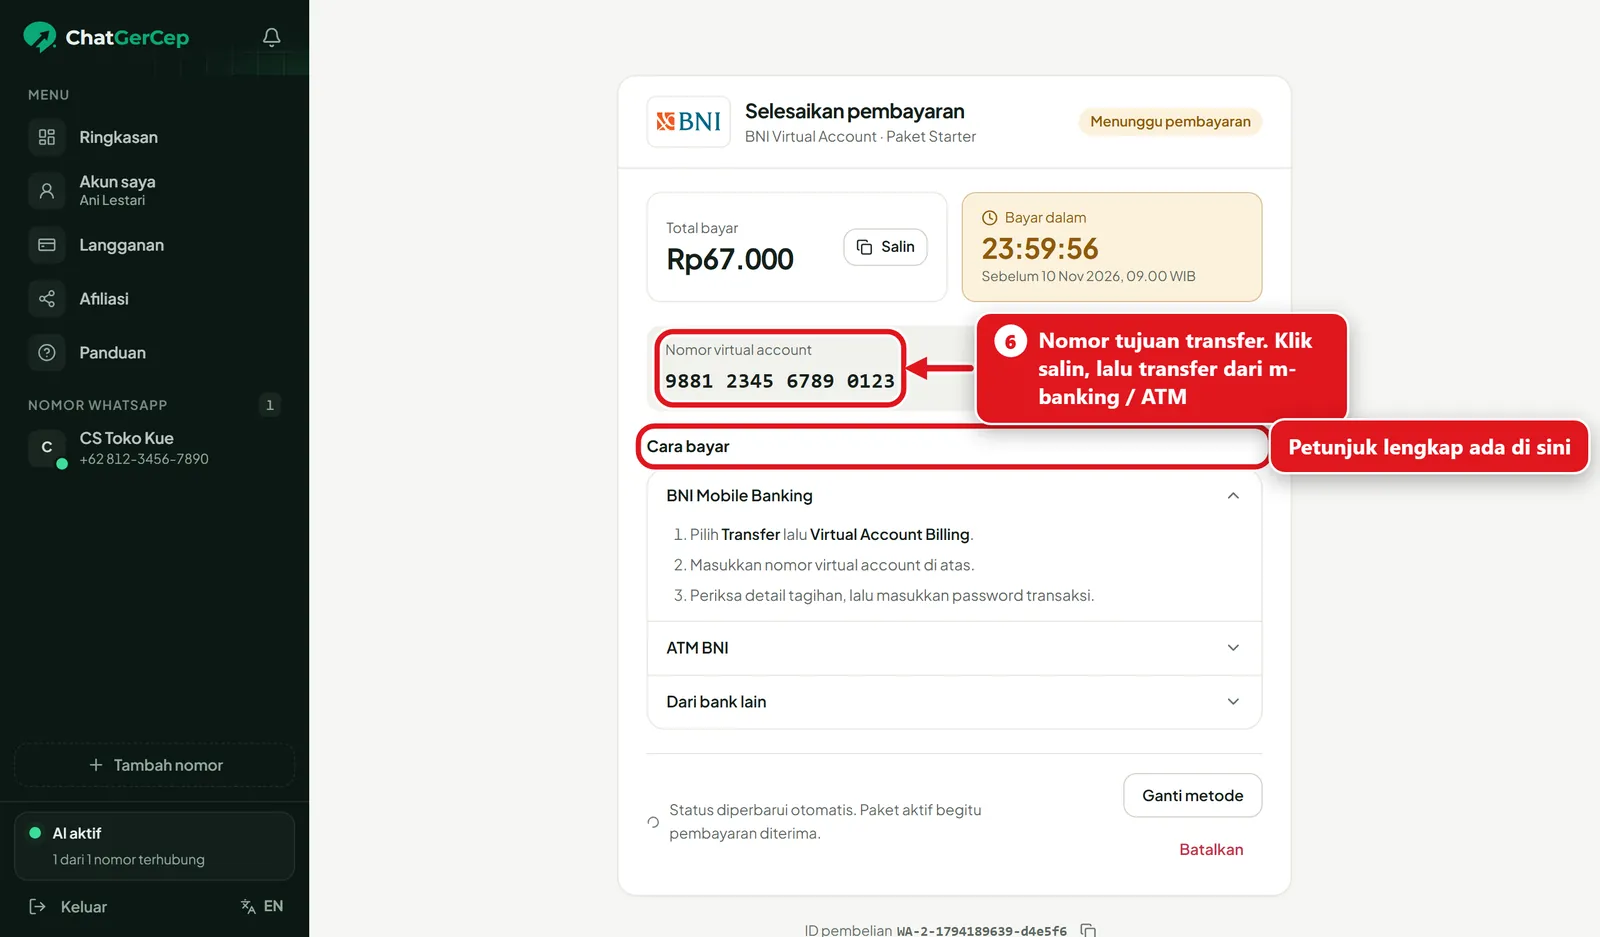
    Or bank transfer: Copy the virtual account number and transfer from mobile banking or an ATM following How to pay. The amount must match exactly.
    1. 6.5

      Paying on your phone

      Using the dashboard on your phone? Just tap Open GoPay, then enter your PIN.
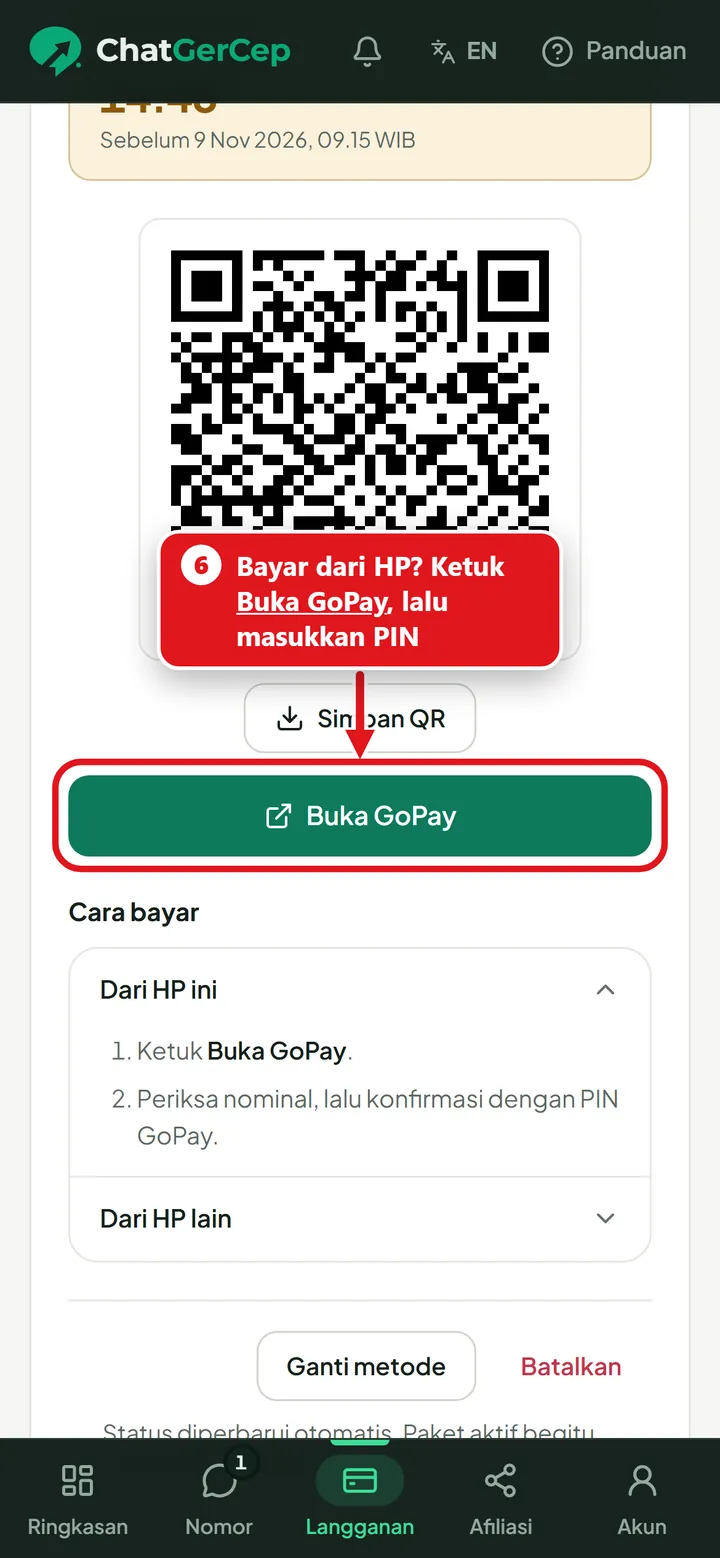
      Paying on your phone: Using the dashboard on your phone? Just tap Open GoPay, then enter your PIN.
  5. 6.6

    Payment successful

    The page switches to Payment successful by itself. Your plan is active right away, no manual confirmation needed.
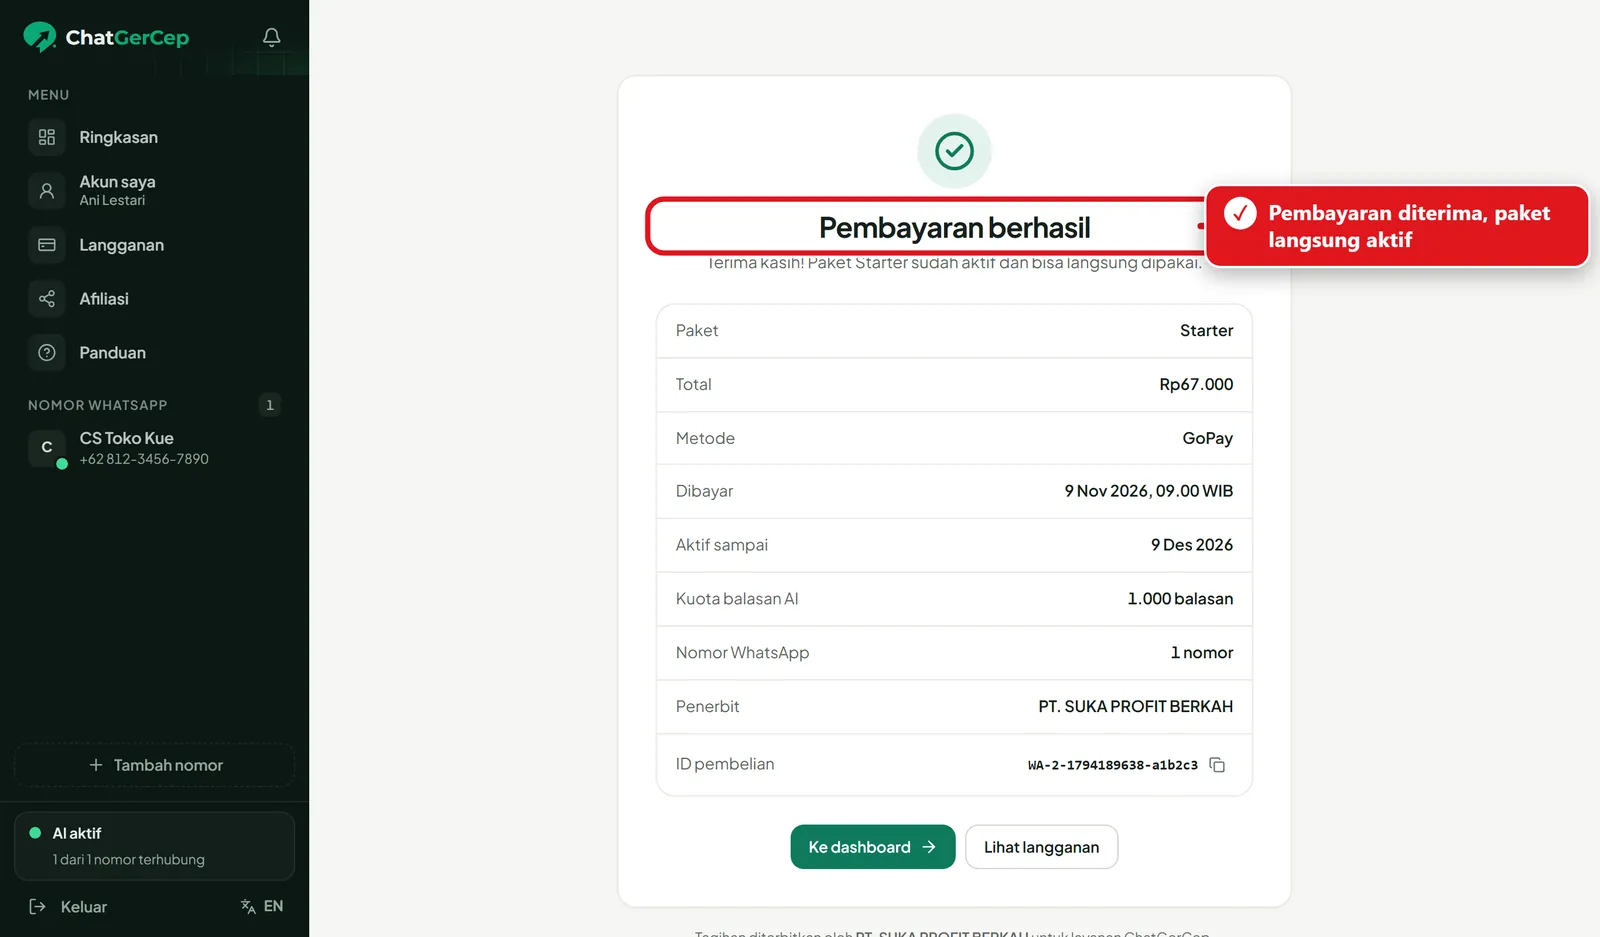
    Payment successful: The page switches to Payment successful by itself. Your plan is active right away, no manual confirmation needed.
Next section7. Turn the AI on & keep an eye on it
7

Section 7 of 7

Turn the AI on & keep an eye on it

Make sure the switch is on, and the AI replies to customers 24/7.

  1. 7.1

    The Auto-reply switch must be green

    Open your number. At the top right there's the Auto-reply switch: green means the AI replies. Want it to pause? Turn the switch off.
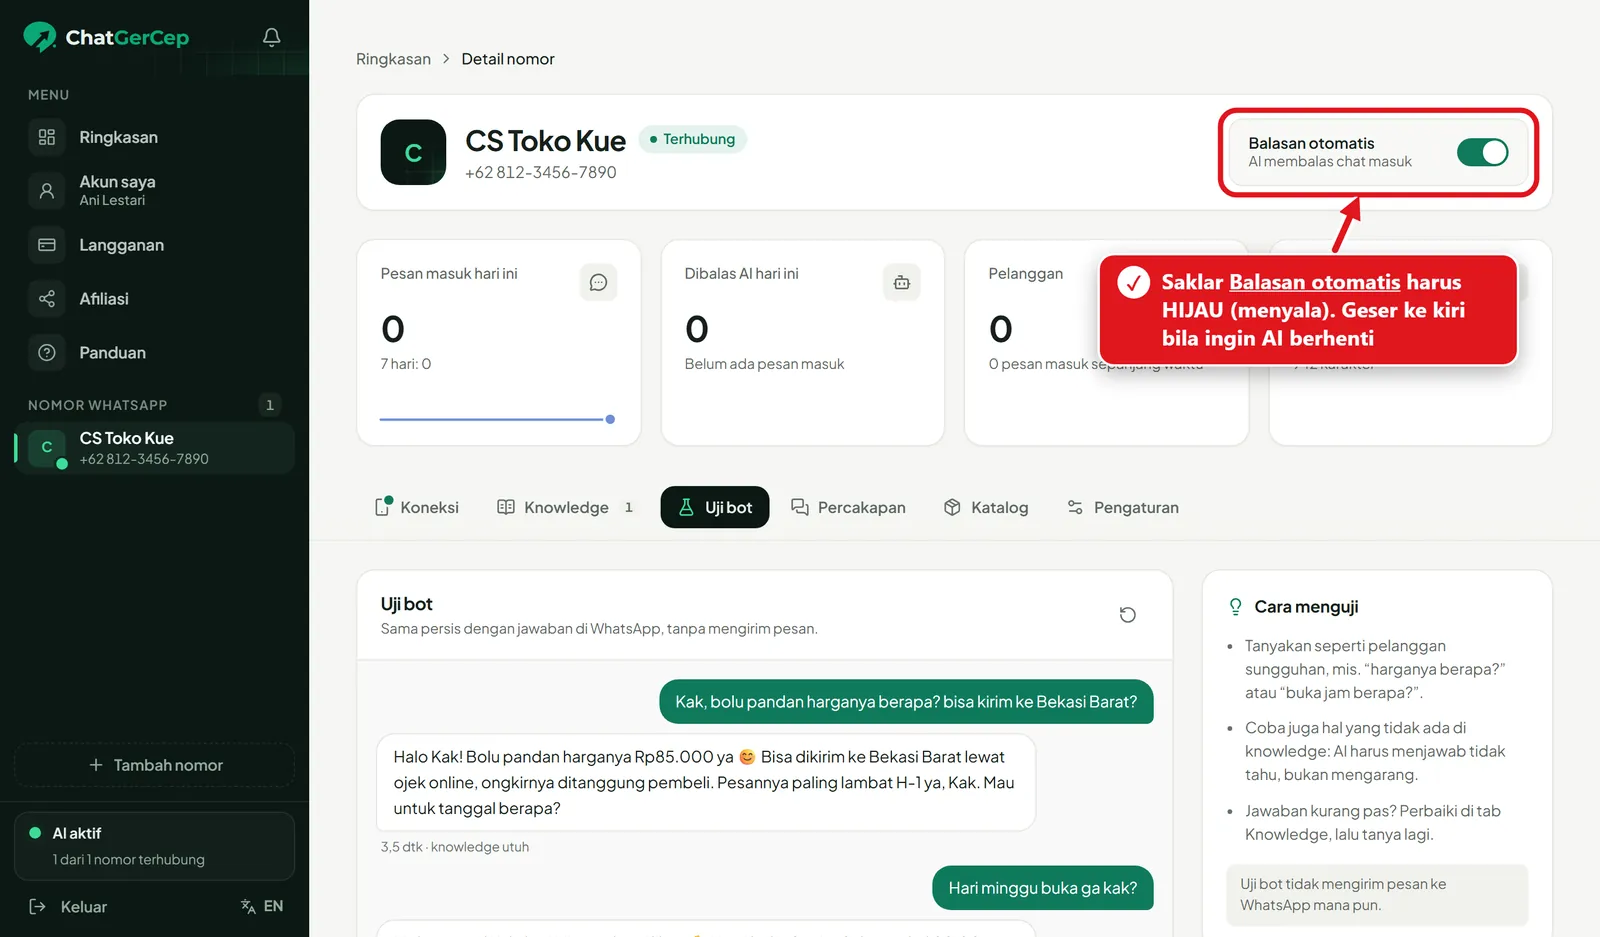
    The Auto-reply switch must be green: Open your number. At the top right there's the Auto-reply switch: green means the AI replies. Want it to pause? Turn the switch off.
  2. 7.2

    Track it from the Overview

    The Overview page shows your active plan, remaining AI replies, and how many messages came in and got answered each day.
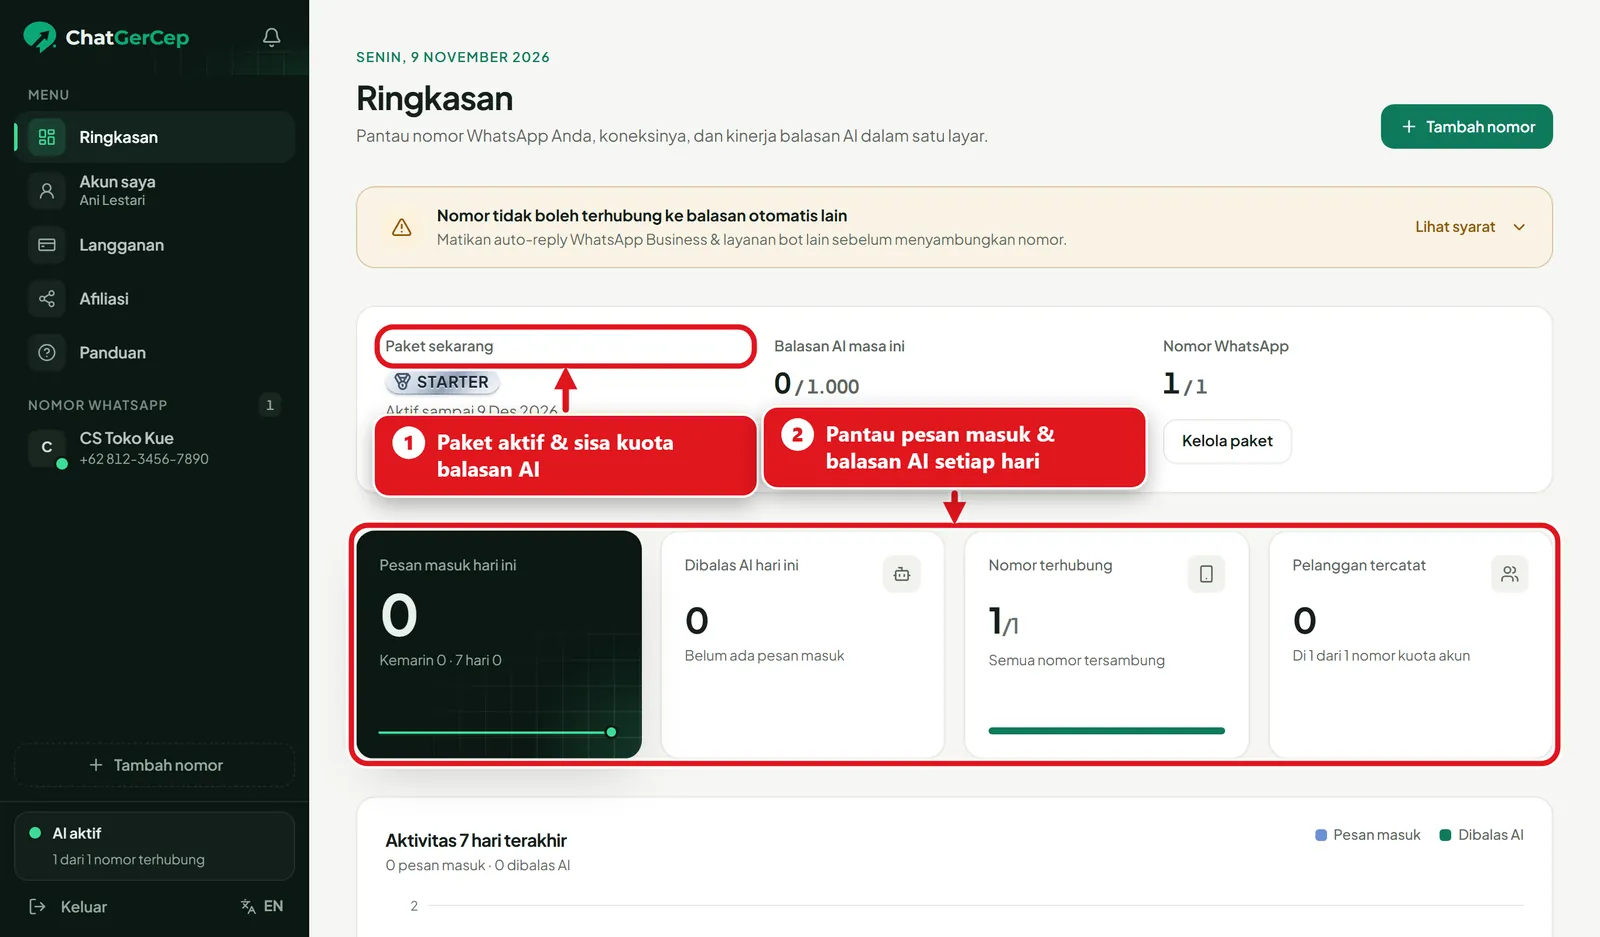
    Track it from the Overview: The Overview page shows your active plan, remaining AI replies, and how many messages came in and got answered each day.

Got the idea? Now it's your turn.

Sign up free, connect your number, and try Test bot as much as you like. The AI starts replying to real customers once you subscribe, from Rp67,000/30 days. Not a fit? 100% money back within 24 hours.*

*For your first payment made with GoPay, ShopeePay, or QRIS.